The Firebird is a fabulous bird. In the drawings, she is depicted as a bird with sweeping wings and a fiery heat on her tail. Except in the pictures, the firebird does not "live" anywhere else, except that there is one small bird with the same name, but it looks more like a bird of paradise, whose feathers shimmer with different colors. It is not difficult to draw a firebird, its drawing is not much different from the drawing of an ordinary bird. She is just a bird, but with a fiery heat on her tail, that's why she is called a firebird. In this lesson we will draw firebird step by step, with a simple pencil.
1. The initial contours of the firebird

First, draw the approximate general shape of the firebird's torso and legs. Remember, these are just the initial contours, you should not draw the details at this stage completely, you may have to correct them. For the initial contours, you need to draw an oval for the body and triangles for the wings. The tail of the bird will consist of an arbitrary shape, copy it from my drawing. You also need to paint on the initial contours of the paws, so as not to forget to draw them in the future.
2. How to draw the wings of a firebird

At this stage, we will start drawing the wings of the firebird. First you need to outline only the base of the wings. In birds, wings are hands, and if you look at how a bird's wing is arranged, it is easy to determine this. Wings draw like twigs on a tree. Next, draw curved feather lines. Now you can draw the body of the bird, but for this, erase the preliminary extra contour lines. Draw an eye and a small crest at the top. There are many small feathers on the body of the bird, they must be drawn. Try to draw them as if they were scales.
3. How to draw bird feathers

Now you need to draw the feathers of the firebird. You need to draw a bird carefully drawing all the details, so the feathers must be drawn in detail. Let's get back to the drawing. Draw the lower contour lines of the wings in a zigzag pattern. From the previous bases of the wings, take bent long "leaves". These will be the main feathers of the Firebird.
4. Draw the tail of the firebird

Now you need to draw curved lines from the previous zigzag to the "leaves". Try to make lines with the same slope, except for the lower lines, which are closer to the torso. In detail, we will start drawing the tail a little later, but for now it will look like a snag, divided into three parts. Fill in these parts with shapes that look like orchid flowers.
5. The finishing touches of the picture

To completely draw a firebird you need to draw ovals that look like eyes with a dark center in the middle. From these ovals, make strokes resembling human hair. And then shade firebird drawing in general and some sections of the wings.
6. Here's what happened

As you can see, drawing a firebird in stages is easy. And if you add a little color in the picture, then the firebird will really become like a fiery bird, with heat on its tail.
In this lesson, you will be able to draw a beautiful Ara parrot in stages.
In this lesson, we learn to draw birds with a pencil in stages. In the future, if you can draw a parrot correctly, you can draw any birds, even draw a firebird.
The swan is a very beautiful bird, perhaps even more beautiful than the firebird. Its beautiful wide wings and especially thin graceful neck give grace and noble grace to this bird.
Pictures of dragons are definitely difficult to draw. In fact, the dragon is a symbiosis of a lizard and a bird, and in the drawing of the dragon it is necessary to reflect the plasticity of these two creatures.
The dove will be a good character for drawing a wall newspaper dedicated to Teacher's Day, especially by May 1 and Victory Day - May 9. Everyone knows that a dove is a symbol of peace and happiness, so very often pictures of doves are also used for weddings.
Bees have a lot of small details, which complicates drawing, but at the same time, drawing a bee is a good lesson for children who are fond of drawing, as it develops mindfulness and the ability to maintain proportions.
Butterfly is easy to draw. But, there are difficulties. You need to be able to draw pollen on the wings and patterns similar to those of the firebird's feathers.
Already drew +7 I want to draw +7 Thank you + 73
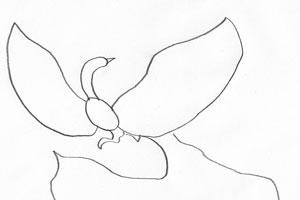
Step 1.
At the beginning of the drawing of the firebird, draw the approximate general shape of the body of the firebird and its legs. Remember, these are only the initial contours, you should not draw the details at this stage completely, you may have to correct them. For the initial contours of the firebird, you need to draw an oval for the body and triangles for the wings. The tail of the firebird will consist of an arbitrary shape, copy it from my drawing to your sheet. It is also worth painting on the initial contours of the paws of the firebird, so as not to forget to draw them in the future.Step 2
At this stage, we will start drawing the wings of the firebird. First you need to outline the base of the wings. In birds, wings are arms, but they are, of course, different from human ones. If you look at how a bird's wing is arranged, it is easy to determine this. Wings draw like twigs on a tree. Next, draw curved lines of feathers on them. Now you can draw the body of the firebird, but for this, erase the preliminary extra contour lines. Draw an eye for the firebird and a small tuft at the top. There are many small feathers on the body of the bird, they must be drawn. Try to draw as if the scales.
Step 3
Now you need to draw feathers for the firebird. You need to draw the firebird with all the effects, so the feathers must be drawn in detail. Let's get back to the drawing. Draw the lower contour lines of the wings in a zigzag pattern. After from the previous bases of the wings, take away the bent long "leaves". These will be the main feathers of the firebird.
Step 4
Now you need to draw curved lines from the previous zigzag to the "leaves". Try to make lines with the same slope, except for the bottom lines, which are closer to the body. In detail, we will start drawing the tail of the firebird a little later, but for now it will look like a snag. To draw a tail, you need to divide the tail into three parts. Fill in these parts with shapes that look like orchid flowers.Yudina Elena Vitalevna
You and I are adults, we remember our favorite fairy tales that our parents read to us. Fairy tales are loved by everyone! Children listen with pleasure when fairy tales are read to them, especially if you need to help the heroes in a fairy tale, it is not an easy path to go with them! However, fairy tales are not just fascinating stories, they are very useful for our children!
Fairy tales were popular in ancient times, they were told, read, retold, having heard from someone. Much has changed, characters, plots, scene, but the essence of the process has remained unchanged!
Let's think? Why are fairy tales needed? What role do they play in a child's life? Why, from an early age, children love to listen to them, read them? Of course the answer ready: "It's good fun for a kid!" But, in fact, the need for fairy tales is much greater! Mystical, fantastic stories help kids learn about how the world was created, what it is, they get an idea about it, about human relationships. The concept of good and evil, meanness and nobility, betrayal, friendship - this prepares the child for how to behave in various situations, if obstacles arise on the way, when you are offended, or someone asks for help.
Parents often tire kids with moralizing, rarely achieve their goal, and a fairy tale sometimes gives the necessary information in an accessible form, the child easily understands this or that situation. It is a fairy tale that is a tool for their education!
The influence of fairy tales is great: they teach good, give an understanding that just like that, nothing is given in life, everything is achieved only by diligence, children learn to fantasize, thereby developing speech, imagination, a child who smiles a little, suddenly starts laughing, he relaxes - the lack of emotions is compensated! In addition, the fairy tale teaches to overcome difficulties, teaches to think, teaches communication skills.
The story is wonderful! Love, peace, adaptation to real life!
All of this is a FAIRY tale!
As part of a theme week in kindergarten: "World of Fairy Tale", many events took place. Children visited the library, watched video fairy tales, listened to fairy tales that were recorded on the disc. Of course, the games and classes were more emotional, the children fantasized, sketched what they heard. One of the homework tasks was to solve a riddle and find a clue in a fairy tale.
My question is
Believe me, it's simple!
Who, like a fan, has a tail?
Feather who is proud of?
What kind of bird?
Take a look at the book with mom
And give me an answer!
Homework has been completed! The riddle was solved, and we boldly proceeded to the next task!
Drawing firebirds! Here's how she turned out!
In fairy tales Firebird,
He sits in a cage.
flies a little,
More silent.
Our bird
Not in a cage
She is beautiful,
Feathers glow with fire
And light all around
Like a day!
We invite you to draw with us firebird!
The album sheet is in front of you. We orient ourselves and draw two circles in the middle, different in size. (big and small). We connect them with lines, we get the body of a bird, we finish drawing the beak, eyes, plumage on the head. The image is ready.


She glows, sparkles
The feathers are on fire!
The hardest part is the tail. With a pencil, draw a small semicircle, then a large one, determine the position of the tail. To make the pattern on the tail symmetrical, divide it into even parts, and only then add a pattern to the tail. It can have a different shape, the oval fits the best, closest to the original. The artist's hand makes the final touch - we finish the small details and the bird is ready!


Coloring with watercolors step by step. We advise you to take a brush with a thin pile, it is more convenient for a child to trace complex lines. Coloring is the same as drawing with a simple pencil - from the body to the tail. Advice: first apply a pattern to the tail, and then paint over it. Be careful and patient, then drawing will bring satisfaction and a lot of emotions!


Our mini-lesson has come to an end! Thank you for your attention!
We hope that in your life a fairy tale will always be there, will help and tell you!
Related publications:
Fairy tale "Firebird" In some kingdom-state. Bright holiday. Waiting for guests. They brought different gifts for the king on his anniversary. A feast is being prepared in the palace, To bring it down.
Synopsis of the integrated GCD on cognitive development and drawing in the senior group "Firebird, you light up the forest!" Program content: To consolidate the acquaintance of children with folk art. To teach children in the drawing to convey the characteristic features of a fairy tale.
Purpose: to teach children to correlate real and fabulous images, to create in the application the image of a fabulous bird, conveying its unusualness and brightness.
By the holiday of March 8, our girls had to perform the dance of magical birds. The question arose of how to prepare the costumes of magical birds. Buy.
As everyone knows, the Firebird is called a fabulous bird, therefore, very often it is drawn in the process of taking off, when its wings are open and fiery heat appears on the tail. It is because of the fiery tail that this bird got its name. If we talk about drawing the Firebird, then this process is not complicated, fast and does not differ from drawing an ordinary feathered one. Therefore, this lesson is aimed at teaching those who wish to draw the Firebird.
1. Drawing the contours of the bird

The whole process starts from drawing the contours of the future bird, therefore, it is worthwhile to outline an oval for the body, triangles for the wings, head and paws. As for the tail, its shape can be varied. This stage does not require detailed drawing of the details of the future drawing.
2. Bird wings

The second step starts from drawing the wings of the Firebird, therefore, it is worth drawing the base first. They need to be drawn with curved lines, like tree branches. After that, you can proceed to the feathers. Having finished drawing the wings, you can move on to the body, erasing the previous drawing. Also, at this stage, attention is paid to the head, namely, the eye and the crest at the crown. Particular attention should be paid to the small feathers on the body of the bird.
3. Feathers

The lower part of the wings must be drawn in a zigzag shape, and the former base should be erased. Next, we outline each feather in the form of leaves.
4. How to draw the tail of a fabulous feathered one?

The tail begins to be drawn from the wings using curved and curved lines, the slope of which should be in the same direction. If we talk about how it should be in the middle, then it is worth filling it with an ornament that would look like flowers.
5. The final stage

The final steps in drawing a fabulous bird is the detailed drawing of the tail, namely, darkening the ovals in each feather, so the feather can look like an eye. Further, with the help of strokes, some lines are drawn from these ovals that look like hair. And then, you just need to darken some parts of the picture.
6. What happened in the end?
Drawing a bird is a task that often confronts children and their parents. Sparrows, crows, jackdaws, nightingales, bullfinches, eagles, tits and other birds are common objects in children's albums. There is also a place for unusual characters - firebirds and Angry Birds. However, everything is not as difficult as it sometimes seems for novice artists. Using visual lessons and acting step by step, step by step, you can make a high-quality and clear drawing. After several trainings in drawing a bird, the child will get better and better.
Bird Drawing Tutorials Step by Step
Bird drawing lessons with step by step photos for beginners will help artists master the art of drawing birds on paper.
Wintering Bird: Draw a Sparrow
Sparrows are the most popular among wintering birds. Creating a drawing of such a bird is quite simple if you act in stages.
- You need to draw an elongated oval. This is the base of the body of the bird.

- At the top of the workpiece, you need to draw a figure with rounded contours. This will be the head. Several straight lines are drawn below. This is the tail of a wintering bird.

- Further, the beak is clearly drawn.

- Then you need to create the outlines of the breast, wing with smooth contours and complete the eye.

- You need to draw a sparrow's paws with a pencil.

- It remains only to color the drawing using colored pencils or felt-tip pens. You can use paint if you wish.

Bird in flight: draw a seagull
- The process of drawing a bird in flight is much easier than it looks. Even a child can cope with the task. First you need to draw a circle, which in the future will become the head, and the body of the bird. The bottom and top of the body should be a little sharp. Rounds are not needed. Then the eye and beak are drawn, after which the contours of the circle must be erased with an eraser.

- Now we need to draw the wingspan and tail. The wing, which is located closer to the right edge of the paper sheet, should be much larger and longer than the second and the body. No need to grind!

- Next, you need to finish the paws and wings. The first need to be depicted folded tightly to each other.

- Then you need to draw lines from which the thigh will turn out. To do this, the contour is drawn from the paw of the seagull down. Next, depict the feathers on the tail and wings of the bird.

- It is necessary to remove all unnecessary contours.

- It remains to draw shadows. The wings of a bird in flight should be made almost black and the bottom of the seagull should be very dark. Plus, a shadow also falls on the body from the wing. On the second wing, located closer to the left edge of the sheet, you should slightly outline the outlines of feathers along the entire length. Similar contours need to be done on the body and near the head.

Angry Birds (Angry Birds)

Tit
This master class is designed to help you draw a titmouse.
- We draw a circle: this is the future head. With straight lines we sketch the torso of the titmouse.

- We give the necessary outlines to the head of the bird. We make a beak of a titmouse and draw an eye in the upper right part of the head.

- We make the contours of the torso of the titmouse more distinct. The head should flow very smoothly into the body. Draw the abdomen rounded. We remove auxiliary lines.

- Now we draw a branch. We depict the wing of the tit and the upper part of the legs of the bird.

- We complete the image of the paws. We draw fingers and a tail.

- With small, jerky lines we outline the borders of the color transitions. Draw feathers on the wing and tail.

- We finish the work: we shade the head and tail of the titmouse. We draw small feathers where necessary.

Woodpecker
Thanks to this master class, you can gradually draw a completely cute and realistic woodpecker. MK will help adults and children who decide to master the technique of drawing birds.
- We schematically create the contours of the head and torso of the future woodpecker. In this case, a sheet of paper should first be divided into barely noticeable four parts.

- Further, a sketch of the tail and beak of the bird is also sketched.

- Now we need to draw the general outline of the torso of the depicted object and its head.

- We are engaged in the creation of details and their distinct drawing: eyes, beak, feathers, wings, etc.

- We complete the work on the nuances and erase all the auxiliary elements.

- We shade with a simple pencil all the necessary areas according to the natural coloring of the woodpecker's plumage.

Bullfinch
The proposed detailed MK will help beginners draw a very attractive bullfinch on their own.
- Before starting work, we divide the sheet into four segments. This will help you draw correctly. Draw, as in the picture below, 3 circles. This is the basis of the future bullfinch.

- Next, a general contour of the image is created with smooth lines.

- Outline the previously created silhouette of the bullfinch.

- We draw paws of a bird and a tail. We create recognizable details of the bullfinch. Let's not forget the eyes. Erase all unnecessary lines.

- Add small details of the paws and plumage of the bullfinch.

- We shade all the necessary areas.

Magpie
Using the step-by-step instructions below, you can easily draw a magpie. Following the recommendations and using drawings as hints, even novice artists will certainly succeed with a bird.
- First, draw a circle. From it we form the head of the future magpie, drawing a beak and an eye.

- We make a sketch of the silhouette of a magpie. At this stage, it is important not to forget about observing the proportions of the picture.

- We direct the shape of the body of the magpie.

- We draw a tail, paws, wings.

- Showing other details. We form the contour of the separation of the shades of the magpie.

- We make the plumage of the bird along the lower contour. We depict feathers and erase all unnecessary.

- We shade all areas in accordance with the plumage of the magpie.

As you can see, drawing a bird with a pencil in stages is nothing particularly difficult. Tips for beginners will help to cope with the task in a few steps. Such drawing lessons will appeal to both a child and an adult. After all, the image will certainly turn out to be clear, realistic and original.