It is carried out with a needle, gives a thin elastic edge without teeth. When performing such a closure on the front surface, it gives an edge that is symmetrical. General idea. Let's say you knit with the front stitch and pulled out a knitting needle. Open loops look like this:

Now, if each loop is mutually connected with an adjacent loop, you get something similar to the end result of interlocking the closure of loops when knitting with a satin stitch (see below part 1):

Applied to the knit 1 x p1 elastic, you will get a result that looks the same (see part 2 below): the columns of the knit stitches are highlighted in blue.

Instructions are given for circular knitting, as this loop closure method works well for socks, hats, and other garments that require an elasticated closing edge. If you are not knitting in a circle, skip the Setting section and go directly to the Closing section.
Part 1: stitch closure interlocks

The interlocking of the closure of the loops, performed over the row of the front surface, is exactly equivalent (in the case when the next row is knitted with the front ones behind the front wall). It is the perfect choice for scarves, fingerless gloves, or any project that benefits from symmetry between the inlaid and closure edges. Pink shows the typesetting edge, red - the closing edge.
Installation. Leave the tail of the thread at least 5 times longer than the edge of the thread to close, or a little longer if closing the elastic. (Note that the pictures show a short ponytail in excellent color - this is for illustration purposes only). Pull the thread through a blunt needle. Then insert the needle into the first loop on the left knitting needle as when knitting with a purl (back). Leave a loop on the spoke.

Insert the needle into the last loop on the right knitting needle as for knitting (front to back). Leave a loop on the spoke.

Closing.
Insert the needle into the first loop as when knitting with the front one, then into the second loop as when knitting with a purl. Discard the first stitch from the knitting needle; leave the second loop on the needle. Do not tighten the thread yet!

Please note, the working thread is now before work. Thread the needle into the loop of the working thread before the first buttonhole (which you just dropped). Make sure the leaks are not overturned. Go through this loop from front to back.

Pull the thread very carefully while pulling the needle horizontally to the right.

That's all. Repeat steps 1 and 2, then carefully pull up the thread, repeat until all stitches are closed. Maintain the same tension when pulling up the thread. Finding the right tension can take a little training at first.
Completion of work when knitting in a circle. When you have reached the last 2 stitches, you need to connect the beginning and end of the circle without a gap. After the needle has passed through the last 2 stitches on the left needle, drop both stitches.

Insert the needle into the loop of the working thread and tighten as you did with all the previous loops.
Insert the needle into the very first turn of the working thread, which was made immediately after the Installation section. Go through this loop from front to back.

Gently pull up the thread, then hide the ponytail.


Loop closure interlocks are great for elastic bands because they stretch and shrink very well. The instructions below are for the gum 1 person x 1 out. If you get the idea, you can adapt the stitch closure interlocks for any pattern on the front and back stitches. Installation. Start with the front stitch at the tip of the left knitting needle. Perform the section Installation as in satin stitch (part 1).
Closing. (1st knit stitch, 2nd stitch purl) Insert the needle into the first two stitches on the left knitting needle as in knitting the knitting needle. Drop the first stitch (face. Stitch). Leave the second loop (out. Loop)

Note that the work thread is now at work. Thread the needle through the loop in front of the face loop you just dropped. Make sure the leaks are not upside down and work through it from back to front.

Pull the thread very carefully while pulling the needle horizontally to the right. (First purl; second knit) Insert the needle from the back into the first two loops on the left knitting needle as if knitting with a purl. Drop the first loop. Leave the second loop.

Please note, the working thread is now before work. Insert the needle into the loop of thread just before the purl. loop. Make sure the leak is not overturned and go through it from front to back.

Pull the thread very carefully while pulling the needle horizontally to the right. Repeat these 4 steps until all stitches are closed. Finish the circle in the same way as when knitting with satin stitch, except that you go through the last two loops as when knitting. If you are out of rhythm, take a break. This mantra will help you navigate. :
- If the first stitch is knit: go through the first 2 knit stitches as you would knit the knit. Thread going backwards: insert the needle due to leakage from back to front.
- If the first stitch is purl: go through the first 2 stitches as if knitting with a purl Thread goes forward: insert the needle due to leakage from front to back.
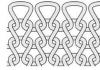
Part 1. Elastic band 1x1.
For convenience, let's agree that loops 1,3,5,7 are the seamy side of knitting, and - 2,4,6,8 is the front side.
So, if necessary, we fix the thread at the edge.
Step 1. The needle enters stitch 1 and exits stitch 2. 
In the diagram: 
The needle returns to the 1st loop (enters from the seamy side) and then pulls the thread into the 3rd loop (exits from the seamy side). 
In the diagram: 
The needle enters the 2nd loop (from the front) and then enters the 4th loop (from the inside to the face). 
In the diagram: 
And pulls the thread into the 5th loop. 
In the diagram: 
The needle comes back again and enters the 4th loop from the front side.
In the diagram: 
Thus, we connect alternately the loops of the face, then the wrong side, retreating to the previous loop. 
This creates an elastic edge. 
Part 2. Elastic band 2x2.
This is another cheat sheet that you will need if you have forgotten how to close the 2x2 elastic bands with a needle. This elastic band pulls together cuffs and large collars on sweaters well.
Working blade of elastic band 2x2
If necessary, fasten the end of the thread. 
To make it clearly visible, I will close the loops with a red thread.
Here is a diagram of the working band of the rubber band. Upper row of loops - purl loops, lower row - front loops. 
The needle enters the 2nd front loop from the inside to the face. 
In the diagram: 
The needle exits from the 2nd front loop and enters the 1st front loop (from the face to the wrong side). 
In the diagram: 
The needle exits from the 1st front loop and enters the 3rd purl loop (from the face to the wrong side). 
In the diagram: 
The needle exits from the 3rd loop and enters the 2nd loop (movement of the needle from the face to the wrong side). 
In the diagram: 
The needle exits from the 2nd needle and enters the 4th loop (from the face to the wrong side). 
In the diagram: 
The needle exits from the 4th loop and enters the 3rd loop (from inside to face). 
According to the scheme: 
The needle exits from the 3rd loop and enters the 5th loop (from inside to face). 
In the diagram: 
The needle exits from the 5th loop and enters the 4th (from the inside out to the face): 
In the diagram: 
The needle exits the 4th loop and enters the 6th loop (from inside to face). 
In the diagram: 
The needle exits from the 6th loop and enters the 5th loop (from the face to the wrong side). 
In the diagram: 
The needle exits from the 5th loop and enters the 7th loop (from the face to the wrong side). 
In the diagram: 
The needle exits from the 7th loop and enters the 6th loop (from the face to the wrong side). 
In the diagram: 
The needle exits from the 6th loop and enters the 8th loop (from the face to the wrong side). 
In the diagram: 
We connect loops 8 and 7.
At first glance, it seems difficult, but if you calmly, without haste, practice, then you understand the pattern of connecting the loops with a thread :)
We get: 
Closed elastic loops look like this. 
Or so, if you close the loops with a thread of the same color as the canvas itself.
This closing of the loops makes it possible for the edge of the canvas to stretch well. 
The method of closing the loops on a 1x1 elastic band with a needle allows you to get a beautiful rounded edge that resembles a tube, which is why it is sometimes called tubular loop closure. This method of fastening the loops has other names: closing the loops with a kettle stitch, closing the loops in the "back to the needle" method. The knitting edge is elastic and stretches well. Securing elastic loops with a needle can be used for any yarn: thin or thick, woolen or cotton. Here we will look at how to close the loops with an elastic band when flat and circular knitting.
At the end of this page, there is a video on closing the loops with a needle.
The seam is sewn back to the needle. The front loops and the purl loops are connected in pairs. The needle is inserted into one loop twice: from below, picking up the right wall, and from above, picking up the left wall of the loop.
Flat knitting
After the edging, there is a front loop
Insert the needle into the first two loops and pull the thread.

We pick up the third, purl, loop on the right wall with a movement from the bottom up and pull out the working thread.

We connect in pairs the front loops... Insert the needle into the first loop from above, picking up the left wall of the loop, into the second loop - from below, picking up the right wall. We draw out the working thread.

We connect in pairs the purl loops... We work in the same way as when connecting the front loops: we insert the needle into the first loop from above, picking up the left wall of the loop, into the second loop - from below, picking up the right wall. We draw out the working thread.

So we continue to connect the loops in pairs to the end of the row. At the end of the row, we fix and hide the thread.
After the hem, there is a purl loop
We insert the needle into the edge loop and the purl loop, we pick up the purl from the bottom up by the right wall. We draw out the working thread.

We connect the front loops in pairs, as shown in the example above.

We connect the purl loops in pairs.

We again connect the front loops in pairs, etc.

Closing the loops of the elastic band 1x1 with a needle in a circle
We reshoot the first (front) stitch on an additional knitting needle or marker. We introduce the needle into the second, purl, loop from bottom to top behind the right wall of the loop and pull out the working thread.
Each craftswoman, carefully knitting her product, tries to make not only a hat, sweater, dress or socks look beautiful. It is equally important for her that the edge of the product is neat and not too tight - it will be more convenient to wear things this way. And no matter what kind of thing the craftswoman knits, she wants to be sure: everything should work out as well as possible. What needs to be done in order for the needle to close the loops correctly, we learn from this article.
To do is right
So, the process of creating a new thing is coming to an end. The only thing that remains is to finish it so that the edge of the product is elastic. It is both beautiful and convenient. It is this method that is called - closing the loops with a needle. Because it is with the help of this little helper that you can complete the work very carefully. This is not so difficult to do. But mastering the process will allow the edge to look as if the product was manufactured in a factory way. Using a needle, it is convenient to close the edges of the necks. This is especially true for huge and high collars on sweaters and jumpers.
An embroidery needle will do. It should be thick, with a blunt tip and a large ear. It is necessary to close the loops with a working thread, leaving its end in advance, the length of which should be approximately three lengths of the closed edge.
Closing the front loops with a needle (in fact, like the purl ones) will not cause any trouble even for not very skillful craftswomen. There is nothing particularly difficult here. The loops of the last row remain on the spoke. It is better to cut the working thread, leaving the tip in three lengths (as mentioned earlier). Needle him. Insert the needle into the first loop from the "face", pass the thread through it and remove from the knitting needle. Leave the second loop, without touching, from the seamy side. Now insert the needle into the third loop from the inside out and pull the thread through it. Insert the needle into the second loop from the "face" and withdraw into the fourth from the inside out. Do the same until the end of the work.
Dealing with rubber bands
This is a pretty convenient way to shut down. Only 1x1 and 2x2 elastic bands can be closed in this way. Then the edge of the product will lie naturally and will be able to stretch freely.
Loops are closed using open loops. In order for them to be quite even and not to bloom, you should finish knitting this part in several rows, which are connected with an additional thread. Usually their number ranges from three to ten. The knitting needle is removed from the loops, the edge of the part must be carefully ironed using a damp cloth. Now dissolve the rows that were previously tied with an additional thread. Insert the warp thread left over from knitting into a needle with a large eye, make a neat seam along all open loops, and place the product with its front side for convenience.
One front, one purl
How to close the loops with a needle in a 1x1 elastic band? Our article will help you figure it out.
From the front side, you should insert the needle into the first hem and second loops. The part must be bent towards you, and the needle must be inserted from the inside out into the first and third loops. Then, from the "face", insert the needle into the second and fourth loops and from the wrong side into the third and fifth.
Closing the loops with a 1x1 rubber band needle will be easy, the main thing is not to confuse anything.

In such a simple way, introducing the needle into two loops at once in turn from the front and back sides, close the loops along the entire row.
Two front, two - purl
What needs to be done to close the stitches with a 2x2 elastic needle? Everything in order.
From the front side, insert a needle into the first hem and second loops. Bending the prepared part towards you, insert the needle from the wrong side into the first and third loops. Then from the "face" it is necessary to insert the needle into the second and fifth loops, and from the wrong side - into the third and fourth. From the front side - again in the fifth and sixth loops.
That's all. Closing the stitches with a 2x2 elastic needle is complete.
Elastic neck closed with a needle
How to properly process the edge of the neckline? If the neck is narrow in the model, then it is necessary to close the loops loosely, otherwise, when worn, the thing will not look very aesthetically pleasing due to the fact that the loops are bulging. But there is one way to avoid this problem - closing the loops on the neck with a needle. It is also called the Italian way.

First you need to knit two or four rows with a 1x1 elastic band. If knitting goes in a circle, you need to do this. First row: knit exclusively facial loops, purl should be removed. Without knitting, leaving the thread before work. In the next row, knit only purl, just remove the front ones, the thread will be at work.
It is necessary to measure the thread from the last loop (the length is about three lengths of the neck) and cut off from the skein. Thread into a knitted needle (it differs from the usual one with a blunt end). Insert the needle into the first front loop on the knitting needle so that it goes to the front side.
Now you need to draw out the thread and bring the needle into the next purl (the needle should go out with its tip to the craftswoman). Remove the purl stitch from the knitting needle and insert the tool into the next knit stitch. Stretching a needle with yarn - a certain structure of three loops on a thread is obtained. Do not tighten too much.

Closing the loops with a needle requires very careful and attentive work, so you need to monitor your every action.
Correct repetition of actions - neat edge
Let's go back to the purl loop: stick in a needle from the seamy side and bring it to the front one. The loop will be on the thread, now you can remove it from the knitting needle. It turns out a kind of imitation of the front loop.
Do not pull the thread from the purl loop, but insert the needle into the next purl loop. Remove the loop from the knitting needle. Pull the thread and stick the needle into the front loop, which was removed in advance from the knitting needle and bring it out of the front loop, which is still on the knitting needle.

Thus, a "snake" is obtained, smoothly flowing from loop to loop.
So you should braid the loops around the whole circle. Having reached the last loop, remove the needle from the purl loop.
Bring it into the last front loop, bring it out into the first front loop, and from it from the inside out into the last wrong side. When the whole circle is knitted, you need to fasten the remaining "tail" and cut off the unnecessary thread. It turns out a very even edge, moreover, it is quite elastic - it passes the head and fits snugly to the neck.
These tips can provide all possible help to those craftswomen who are not yet aces in knitting. But if you follow the suggested recommendations, they shouldn't have any difficulties.
Securing loops with a needle and thread is called a stitching stitch. With this fastening of the loops, the last row stretches as well as when fastening the loops with knitting needles, only a "pigtail" does not form. To fasten the loops, you need to take a separate thread, 3 times longer than the section of the canvas with open loops; darning needle with a rounded point. It is better to let the end of the thread remain longer than it will not be enough during the work.
And more knitting lessons from the very beginning:
Closing the stitches with the needle of the last row is applicable for any pattern. This method is used in the case when it is necessary to obtain a well-stretched edge of the part, for example, loops of a round neck "under the neck".
Method 1. The loops of the last row are left on the spoke. Cut off the working thread, leaving an end equal to three lengths of the row to be closed, and thread it into the needle.
The needle is inserted into the first loop from the front side, the thread is pulled through it and removed from the needle.
The second loop from the seamy side is passed, leaving it on the needle, and the needle is inserted into the third loop from the seamy side and the thread is pulled through it.
Method 2. We hold the work in the left hand. We stretch the needle with a long thread into the first two loops inward from right to left. Then pull the needle just inside the first stitch from left to right and drop both stitches from the knitting needle. We do this to the end of the row - inward into both loops from right to left, into one from left to right and drop from the knitting needle.
For the front cloth:
The needle is inserted into the first extreme loop of the last row of loops from the front side to the wrong side, then into the second loop from the wrong side to the front one and a working thread is pulled through these loops. After that, the needle is inserted into the first loop from the front side to the wrong side and into the third loop from the wrong side to the front side, etc.
For the front fabric: stitch "back to the needle"
For a "hollow" ("double") elastic band:


For 1x1 gum
When fastening with a needle the loops of the last row of parts tied with a 1x1 elastic band (alternately 1 front, 1 purl), the correctly formed edge looks the same as the inlaid edge with the Italian set of loops:


To design a beautiful round final row, 4 rows before securing the loops with thinner knitting needles with a "hollow elastic" as follows: knit the front loops with the front loops, remove the purl loops, as in purl knitting, while pulling the thread in front of the purl loops that are removed.
If the part is knitted in a circle (for example, sleeve cuffs, neck tape, armhole straps), then in the 1st of the last 4 rows, remove the purl loops, as in purl knitting, pull the thread in front of the loop, knit the front loops with the front loops. In the next row of knitting, remove the knitting loops, as in knitting, while pulling the thread behind the loop, and knit the purl loops with the wrong side. Repeat these 2 rows again.
Insert the needle with the thread towards you into the hem loop, (or in the corresponding knit loop for circular knitting of an elastic band), and discard the loop from the knitting needle.
For 1x1 elastic, when there is a purl loop after the hem:

First stage:
Insert the needle into the next purl loop, as shown in the figure, and leave it on the knitting needle;
Second phase:
The needle is simultaneously inserted into the front loop, removed from the knitting needle, and into the next front loop, located on the left knitting needle.
Stage three:
Insert the needle into the previous purl loop and remove from the knitting needle together with the next front loop.
Repeat the described techniques 1-3 until all loops are "sewn".
If after the edging you have a front loop, then:
From the front side, a needle is inserted into the first (edge) and second loops (Fig. 1a).
Bending the part towards you, from the seamy side - into the first and third loops (Fig. 1b).
Then from the front side - into the second and fourth loops (Fig. 1c).
And from the seamy side - in the third and fifth loops (Fig. 1d).
So, by introducing the needle into two loops alternately from the front and back sides, the loops are closed along the entire row.