1. COMFORTABLE BOOTS FOR A NEWBORN BABY
Choosing high-quality and comfortable clothes for a newborn baby is an important step, for which most mothers prepare long before the baby is born. It is known that many modern women pick up knitting needles for the first time during pregnancy, when the baby is already living under the mother’s heart and they so want to knit beautiful original things for the newborn with their own hands!
At what age can you put knitted booties on a child’s feet? The most important purpose of these very first children's shoes is to protect children's fragile feet from possible injuries and from the cold. Therefore, during the period of active development of motor abilities, when the baby begins to independently crawl on the floor and try to stand up, booties are simply necessary! Children's shoes are too uncomfortable for a baby exploring the surrounding space of the room, and the socks are very soft. But in baby booties, your baby’s feet will be very comfortable and comfortable. Knitting booties with knitting needles is very easy, and for beginning needlewomen, many visual lessons with photos, diagrams and descriptions have been published, where each stage of the work is discussed step by step.
Booties will become the baby's most popular footwear by about six months from birth, when the baby begins to learn to stand on his feet and walk. Usually, by this period, many mothers have already knitted 5-6 pairs of various models. But why not knit at least several pairs of beautiful openwork booties with white lace for a girl or booties with ties for a boy by 2-3 months of age? In such shoes, the child’s feet will be warm and comfortable during walks, when the baby will explore the world around him, sitting in a stroller.
IMPORTANT!
Before choosing a bootie model for knitting, prepare suitable yarn. It is best to purchase high-quality natural threads in a specialized store. Since children's clothes need to be washed quite often, the yarn must be resistant to washing;
The yarn should be soft and natural (it’s good if it contains children’s acrylic), and not cause allergic reactions on the skin of a newborn;
Knitted booties should fit the legs tightly enough and not fall off, but at the same time there should be a small gap between the fingers and the toe of the product so that the fingers are comfortable;
Carefully follow the knitting description of the selected model and adhere to the pattern so that the knitted children's shoes have the correct shape;
The seams of baby booties need to be treated very well. All seams should be on the outside, but seamless children's shoes can also be knitted.
What size booties are right for your baby?
Before you start knitting the chosen model, you need to measure the length of your baby’s feet.
The most convenient way is to put tiny socks on your feet, place both feet on a sheet of paper and carefully trace each foot with a pencil.
If you want to calculate the size of children's shoes in the metric system, then you need to measure the distance from the most protruding toe to the outermost point of the heel.
Table of average shoe sizes for babies up to one year:
Newborns (up to 3 months) – 9 cm;
From 3 to 6 months – 11.5 cm;
From 6 to 12 months – 12.5 cm;
From 12 to 18 months – 14 cm;
From 18 to 24 months – 15.5 cm.
How to knit booties with knitting needles (for beginners: step by step):
We will learn to knit comfortable booties for a newborn using knitting needles No. 3 and No. 2.5 from wool blend yarn. We will knit in one piece and decorate the product with a jumper. We will knit with facial stitches (garter stitch).
Step-by-step description of the knitting stages:
- we begin to knit the product from the sole in one piece. First, we cast on 40 loops (knitting needles No. 3). We knit with the front ones, adding one loop from each edge and from the two central loops on both sides 4 times (56 stitches in total)
We knit ten rows to lift the foot (knitting needles No. 3). After this, for the upper part we make 12 loops, knitting at the end of each row the first of the set aside loops with the last loop of the upper part (11 times in total). You will get 34 loops.
We form the cuff. We knit 4 cm of fabric with knitting needles No. 3, and on knitting needles No. 2.5 we knit 2 cm, and then close the loops. Using 2.5 knitting needles, cast on 15 stitches to form a jumper. We knit 4 rows with facial loops and close the loops. Using a thin seam, we connect the back of the bootie and the sole so that on the last 2 cm we form a seam for the lapel on the reverse side.
Sew on a knitted jumper to decorate the booties. Then we proceed to knitting the second bootie, maintaining symmetry.

2. HOW TO KNIT BOOTS FOR A NEWBORN WITH KNITTES. INSTRUCTIONS FOR BEGINNERS
3. KNITTING BOOTS ON SPOKES. STEP-BY-STEP MASTER CLASSES
MASTER CLASS No. 1:
MASTER CLASS No. 2:
MASTER CLASS No. 3:
MASTER CLASS No. 4:
MASTER CLASS No. 5:
MASTER CLASS No. 6:
MASTER CLASS No. 7:
MASTER CLASS No. 8:
MASTER CLASS No. 9:
MASTER CLASS No. 10:
MASTER CLASS No. 11:
A method of knitting booties for a 6-8 month old baby. You will need a set of size 2.5 double needles and beige merino wool yarn.
MASTER CLASS No. 12:
Yarn: “Krokha” Troitsky worsted mill, 20% wool, 80% acrylic, 135 m / 50 g. Yarn consumption: blue yarn 25 g, a little blue for finishing. Tools: knitting needles No. 3, crochet hook No. 3, knitting needle. Knitting density (garter stitch) vertically: 4.3 rows in 1 cm. Size: foot length 8 cm.
The simple model of booties is comfortable to wear and will suit both boys and girls. To knit booties you need to take only one measurement - the length of the foot. In our example, we will knit booties for a foot size of 8 cm. Booties are knitted on two needles.
Video on knitting booties at the end of this page.
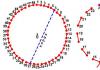
First, let's see what parts booties consist of.
In the photo the following are indicated in different colors:
- orange - leg, the part that is located on the lower leg above the ankle;
- blue - toe;
- green - side part;
- brown - sole;
- yellow - the back of the booties, which includes the side part and the peg at the back.


Most often, this model of booties is knitted with a seam at the back. Svetlana Bersanova has developed a method of knitting without a seam - an elegant and beautiful solution. It will especially appeal to those who do not like to sew parts.
Loop calculation

So we lift 8 loops from the side of the toe. We see that on the front side, where we raised the loops, we got a beautiful braid.

We knit the loops of the side part with the front ones.

Turn the work over to the wrong side. We knit the loops of the side and central parts with classic knit stitches, and the raised loops with granny knit stitches. Now we need to lift the loops on the other side of the toe. To do this, we insert the left needle into the edge loop from back to front behind both walls of the loop and knit a granny knit stitch.

As on the left side, on the right we raise 8 loops. The front side also produces a beautiful braid. We knit the remaining stitches with classic knit stitches. There should be a total of 43 loops on the knitting needles.

We knit the side part of the booties - 12 rows in garter stitch.

In the next front row we begin knitting the sole. To do this, we will knit only 9 loops of the central part (the side parts will have 17 loops each), attaching the loops of the side parts. To do this, remove the first loop of the row unknitted, and the last, 9th, and knit it together with the loop of the side part of the grandmother's front one. In the remaining knit rows we knit two stitches together in the same way as grandmother’s knit stitch, but there is no need to turn the loop over.
In purl rows we knit together the 9th loop of the central part and the loop of the side part of the grandmother's purl. This way we get neat braids along the line of joining the sole on the right and left. In total, we knitted 34 rows of soles and attached 17 loops on each side. There are 9 loops left on the knitting needle.
 Now you need to knit the back of the booties, while simultaneously attaching the edge loops on the sides. Slip the first stitch onto the right needle unknitted. Next we knit a row with facial loops. We remove the last loop of the row from the left to the right needle without knitting. Using the left knitting needle, we pick up the edge loop from back to front by both half-loops.

We return the 9th loop to the left needle and knit the edge and 9th loop together with the granny knitting needle.

On the wrong side we knit the row in the same way, we move the 9th loop from the left to the right needle without knitting. But we knit two loops together differently: we insert the left knitting needle into the edge loop from front to back behind both walls.

Return the 9th stitch to the left needle. We knit stitches together with grandma’s purl loop.
Knitting booties with knitting needles is a very exciting activity for expectant mothers, because it’s so nice to knit cute booties yourself that will warm your baby’s feet.
But if you previously encountered knitting only at school during labor lessons, you only know the basics of knitting and are afraid that you won’t be able to handle even a small thing on your own, then our master class will come to your aid. These knitted booties for beginner craftswomen will come in very handy. They come with step-by-step descriptions, photos and a diagram of the sole.
We will tell you in detail how to knit a beautiful model of booties for a newborn, which can become the basis for your subsequent creativity. For example, for knitting or knitting.
These booties are designed to be worn by a child up to 3 months old. A little bit of growth. The length of the sole is 9 cm.
If you need booties only for discharge, you can switch to a smaller size. Or when knitting according to this pattern, use a thinner thread and hook.
To create booties you will need:
- yarn for knitting children's clothes - 25-30 grams (this is less than half of one skein);
- stocking needles No. 2.5-3;
- hook No. 2.5;
- large needle for sewing knitwear;
Knitted booties for newborns (from 0 to 3 months) - Master class for beginners with diagram and description:
1. We will start knitting booties from the sole. We cast on 8 loops + 2 edge loops on two knitting needles. 
2. We begin to knit with stockinette stitch, i.e. The front rows are knitted with knit stitches, and the purl rows with purl stitches. We knit the first row without increasing stitches, and in the second we begin to make increases according to the pattern.

Picture Diagram of bootie soles

3. We perform increases as follows - remove the first (edge) loop and insert a knitting needle into the jumper between the loops - you get an extra yarn over, which we knit like a knit stitch. We also increase before the last (edge) loop. 

4. In the third row we also make increases according to the pattern, and then we knit 7 rows with straight fabric and again knit a row with increases on each side. 
5. We knit another 10-12 rows with straight fabric, depending on how long you need the sole. For an older child, we knit more rows accordingly; for a newborn, 10 rows will be enough. 
6. Next, we perform rows with decreasing loops - to do this, before the edge loops, we knit two loops together, knit or purl, depending on the side on which the row is located. We do not close the last row. 
7. Leave the last row on the knitting needle (you need to knit the front row last) and cast on loops for the side walls of the booties - 14 loops on the sides and 8 loops on the heel, the same 10 loops remain on the toe. 
8. Next we knit in the circle with front rows, knit 3 rows. In order for a ruffle to form on the booties, you need to perform the following row - knit two stitches together, yarn over, then knit two stitches together and yarn over again. This is how we knit the entire row. 
9. Next we knit 3 front rows, which will belong to the ruffle. We knit the yarn over like one knit one. 
If you bend the knitted fabric at this stage, you will see “teeth”, which will form a ruffle. 
10. Now we knit 10 rows in stockinette stitch - the fabric has formed the side walls of the booties. 
11. It's time to close the sock. To do this, we will perform decreases on both sides of the toe. We knit the front row of the sock (10 loops), transfer one loop from the next knitting needle and knit it together with the last tenth loop of the row that will form the toe of the bootie. 
12. Unfold the knitting and knit a purl row, also transfer a loop from an adjacent knitting needle and knit two loops together purl. 
13. Thus, we knit the bootie toe with knitting needles until there are 8 loops left on the adjacent knitting needles. 
14. We knit another front row of the sock, while decreasing on each side. This way we will have 8 loops on each knitting needle. 
15. Next, we continue knitting in the round with right rows. We knit 5 rows and perform 1 row in the same way as we formed the ruffle on the sole, i.e. knit two together, yarn over and two together again. A ribbon will then be inserted into this row, which will secure the bootie on the newborn baby’s leg. 
16. We knit another 5-7 rows and again knit a row to form “teeth”. 

17. We knit 3 more rows with knit stitches and close the loops as follows - cut off the working thread (tail about 40 cm) and insert it into a needle for sewing knitwear. Using a needle and the same working thread that we knitted, but cut, we begin to close the loops - we lower one loop from the knitting needle and sew it at the level of the third row from the place where we made the row to form the “teeth”. This is how we sew all the loops on the knitting needles. We fasten the thread from the wrong side and cut off the tail. 
This is how you get a ruffle from “teeth”; by the way, in this way you can process the edges of not only booties, but also blouses, as well as the necks and sleeves of various products. 
18. Now we sew the ruffle on the sole of the bootie. We fasten the thread from the wrong side and on the front side we sew a seam “back with a needle”. 
It turns out that this is an almost finished bootie. 
19. Crochet a cord of 100 air loops. 
20. Insert it into the holes on the bootie and tie a bow. 
21. We knit the second bootie in the same way.

Now your baby’s first knitted shoes are ready. You can decorate booties for a newborn according to your taste and imagination - beautiful baby buttons, beads, ribbons, ruffles and everything that you have in your handmade bins can also be used.
The booties knitted with knitting needles turned out to be 9 cm. For a child from 0 to 3 months.


A master class on knitting booties for beginners was prepared by Irina Nikonova.
A selection of 10 descriptions of knitting booties. Detailed descriptions and diagrams of wonderful booties for our babies.
1 Booties knitted on two knitting needles
We start knitting from the sole. You need to cast on 40 loops, of which we will knit 2 rows with garter stitch (bed). Then, on the next 4 beds, you need to add loops on the front side: 1 on each edge and 2 loops in the center of the sole. There should be 56 stitches on the knitting needles. Next, knit 4-5 beds with threads of a contrasting color.
The sole of these booties is knitted in garter stitch, and the sides are knitted with a “ Corn”: Row 1 – k1, p1. 2nd row – knit the front loop, make a yarn over before the purl loop, and slip the loop itself onto the right needle without knitting. 3rd row - before the double crochet loop, make another yarn over and remove this double crochet loop without knitting, knit the purl loop. Row 4 – purl a knit stitch, and purl a loop with two double crochets. Continue further from the 1st to the 4th row.
After knitting the sides, remove 23 loops from the beginning of the front row, without knitting on an auxiliary needle. Next, knit only 10 stitches with 2/2 rib, starting and ending with two knit stitches. At the same time, together with the tenth loop, knit one from the side (from 23 loops). On the front side of the work, knit two loops together with the front one, and on the wrong side - 2 loops together with the wrong side. Knit like this until there are 11 loops left on each side, remaining from each side and the middle 10 loops (32 loops in total). They will need to be knitted with a 6-8 cm elastic band, and then the last 3 rows will need to be knitted with “grass” yarn.
Sew a shoe. Ready!
2 Pattern for knitting booties
The number of loops is a multiple of 3+2+edge loops. 1 row. Chrome. loop, 2 persons p., * 1 yarn over, 3 knit stitches, then throw the first of the three knitted loops over the other two *, 1 knit stitch, chrome. p. 2 row. Purl all loops and yarn overs in row 3. chrome p., 1 persons. p., *knit 3, then throw the first of the 3 knitted loops over the other two, 1 yarn over*, k2. n., chrome. p. 4 row All loops and yarn overs are knitted with purl p. Repeat from 1 row.
Sole: cast on 19 loops and knit in stockinette stitch, adding 1 loop at the beginning and end of the 1,3,5 and 7th rows and then decreasing at the beginning and end of the 9,11,13 and 15th rows. You should get 19 loops again. We knit all even rows purl.
Top part:
There are 19 loops left on the knitting needles (let this be the 1st knitting needle). Take the 2nd knitting needle and cast on 11 loops for the toe on the knitted sole, 19 loops on the 3rd knitting needle (2nd side) and 11 loops on the 4th knitting needle (for the heel). It turns out that we will start knitting the row from the 1st knitting needle. In what follows I will only mention the spoke number. It turns out to be only 60 loops on 4 knitting needles. Row 1-2: knit in the round. For convenience, the beginning of the first row can be marked with a thread of a different color. 3rd row: knit cloves - yarn over, knit 2 together, repeat until the end of the row. 4-5 row: knit row 6: knit with knit stitches, using a hook to grab the loops of the 1st row from the wrong side of the sole. It turns out that the uneven edge of the sole will end up inside the teeth. 7-12 row: knit 13 row: knit up to the 2nd knitting needle, i.e. 19 loops, then knit the sock on the 2nd knitting needle like this: * slip 1, knit 9, knit 2 together (1 loop from the 2nd knitting needle, 1 from the adjacent 3rd knitting needle) turn the knitting 1 slip, purl 9, purl 2 together (1 loop from the 2nd knitting needle, 1 from the adjacent 1st knitting needle)* turn the knitting and repeat * * 8 times i.e. knit until until there are 11 loops left on the 1st and 3rd knitting needles, turn the knitting and knit on the 2nd, 3rd and 4th knitting needles, i.e. until the end of the 13th row (we didn’t finish it because we started knitting a sock) Row 14-15: knit 16 row: knit holes for the ribbon - yarn over, knit 2 together, repeat Row 17-24: knit Next, we knit a heart, but in general you can knit anything.
We knit the heart on the 2nd knitting needle, respectively, the loops on knitting needles 1,3 and 4 will be knit in all rows. I describe only the 2nd needle (11 loops): Row 25: knit 4, knit 3 from 3 loops, knit 4. 3 knits out of 3 are knit, yarn over, knit (I’ll call this element bush) 26 row: 11 knit 27 row: 2 knit, bush, 1 knit, bush, 2 knit 28 row: 11 knit 29 row: 1 knit, knit, bush, knit 3, knit 1 Row 30: knit 11 Row 31: knit, knit 1, bush, knit 1, knit 32 row: knit 11 Row 33: knit 2, knit, knit 1, bush, knit 2 in this way we knitted rows 25-33. 34-41 row: knit 42 row: knit the cloves - yarn over, knit 2 together, repeat 43-45 row: close the front edges, fold them over the cloves and sew the edge to the wrong side.
4 Description of booties on two knitting needles “Easy and simple”
We will need yarn of 2 colors and knitting needles of a suitable number (For example, 100% acrylic yarn 100g\300m and knitting needles No. 3) Cast on 31 loops (main thread) 1st row: 31 front. 2nd row: K1, add 1, k14, add 1, k1, add 1, k14, add 1, k1. 3rd row: 35 persons. 4th row: 2 knits, 1 ext, 14 knits, 1 ext, 3 knits, 1 ext, 14 knits, 1 add, 2 knits. 5 row: 39 persons. 6th row: 3 persons, 1 ext, 14 persons, 1 ext, 5 persons, 1 ext. 14 persons, 1 ext, 3 persons. 7th row: 43 persons. 8th row: 4 persons, 1 ext, 14 persons, 1 ext, 7 persons, 1 ext, 14 persons, 1 ext, 4 persons. 9th row: 47 persons. “Tooths” (finishing thread) 1r: persons.p 2p: purl; 3p: persons.p; 4p: purl; 5p: K, *knit 2 together, yarn over*. Repeat from ** to the end of the row, K. 6p: purl; 7p: persons.p; 8p: purl on the wrong side. Walls (warp thread) 10 rows in garter stitch. Toe. Decrease up to 32 sts. Rib 1x1 15 rows. We sew the bootie and tie the top of the bootie “1 st b\n, prop 1 p, 3 st c\n, prop 1 p” in a circle, fasten the thread and break it. Decorate as desired and admire the result
5 Booties. Master Class
We put 37 stitches on the knitting needles with a thread of the main color and knit 1 row with knit stitches. We mark the central loop with a thread of a different color.
Next, we knit the sole 8 rows in garter stitch, adding 4 loops in each front row (1 after the first loop, 1 before and after the central loop and 1 before the last loop). This is done so that the sole is oval; we make increases with a crossed loop so that there are no holes.
This is what the sole looks like. There should be 53 loops on the knitting needles.
Then we begin to knit the cloves with a thread of a different color. To do this, we knit 3 rows of stocking stitch, starting from the front side of the work.
In the 4th row (on the wrong side) we knit like this: yarn over, 2 loops together, etc. until the end of the row. We do not cross the yarn over to create holes.
In the 4th row, bend the knitting over the holes and begin sewing the cloves. This is done like this: knit 2 loops together - one loop from the knitting needle and one loop of the first row, knitted with a thread of a contrasting color. Do this by knitting all the stitches on the knitting needle and the garter stitch stitches.
Switch to the main color threads and knit the side part of the bootie. Here there is scope for your imagination, you can knit with any pattern, on the sample it is knitted like this: 1 row: with purl loops on the front side of the work, 2 row: with front loops on the wrong side. Row 3: purl to knit. Row 4: purl across. Row 5: knit across the face. Row 6: knit on the wrong side. Row 7: Purl across the face. Row 8: knit on the wrong side. Row 9: knit across the face. Row 10: Purl across. We knit the next 5 rows as from row 1 to row 5.
Next we shape the nose of the bootie. To do this, we knit 13 loops purlwise, and on the next. 27 loops knitting principle, like a heel to a toe. That is, we divide them into 3 parts, knit the middle 9 loops, at the end of each row we knit the ninth loop together with the loop from the other part, somehow, I can’t explain it properly. We decrease the loops until there are only 9 middle loops and 13 loops on each side. We knit to the end of the row.
Then 3 rows in stocking stitch and 3 rows as from rows 1 to 3 (see above). Next, 4 rows with an elastic band and 6 rows with a thread of a different color in garter stitch. Phew, I wrote it, it’s clear, it’s not clear, I was just describing how I knitted, but this way you can knit, depending on your imagination. Close the loops
Sew the bootie inside out. Insert the lace.
| 6 Booties “So different!” |
Now we take another thread and knit “teeth” 3 rows - knit, 1 row - yarn over, 2 loops together. And again knit 3 rows. The “white track” is very clearly visible on the wrong side; we pick it up on an additional needle and knit the green loop and the loop from the additional needle together.
The “teeth” are ready. Now we knit in a circle, (We have already knitted one row) We knit the next row with purls, then again 1 row with knits, and 1 row with purls. Take another thread and knit 1 row of knits and 1 row of purls.
There are 14 rows in total, or 3 tracks of a different color. We knit a “toe” for this on the first knitting needle we have 16 loops, for 2-10, take the main thread, knit 9 knit stitches, 2 together, turn over - 9 knits, 2 together. Change color every two rows. We have 16, 10, 16 left (42 loops) we knit with white thread - 1 row of knits, 1 row of purls. Using green thread we knit holes for the lace: 1 row of knits, 1 row: yarn over, 2 loops together, 1 row of purl. Next we knit with an elastic band 1*1, 17 rows
Now we will turn the bootie inside out and continue knitting. We knit 1 row of knits, 1 row of purls with green thread. (Pattern - the number of loops is divided by 4, we have 42, in the first row with green thread, I decrease 2 loops, and on 40 loops I knit the pattern) With white thread, 1 row: k1, * remove 1 loop while working, 3 persons*. Row 2: P1, *Slip 1 stitch, thread at work, P3*. Repeat rows 1 and 2 again. Knit 1 row of knits, 1 row of purls with a thread of the main color.
Then with white thread: knit 3, remove 1 loop, thread at work. Next row: purl 3, slip 1 stitch, thread at work. Repeat these two rows again. We knit with green thread: 1 row of knits, 1 row of purls. White thread: k1, slip 1 loop, thread at work. In the next row we knit: purl 1, slip 1 loop, thread at work, purl 3. We repeat these two rows again. And we knit 1 row of knits, 1 row of purls with green thread. Here's what happened:
The pattern fits well. The threads are changed on the wrong side, but on the front side it is not visible. We knit 1 row of knits, 1 row of purls with white thread, and close the loops. We sew up the trace. The bootie is ready.
Insert a ribbon or pompom
Knit 1 whole repeat, and the first 6 rows of repeat. Next, form the rise: knit with white acrylic yarn or satin stitch, distributing as follows: 28 knits, 3 loops together, k2, 3 loops together, 28 knits. Further decrease on both sides of the 2 central loops 7 times, 1 loop each. Tsevoy In total, there should be 46 loops left on the knitting needles. Knit 1 row with holes as follows: *Knit 2 stitches together, yarn over, k1.* Next purl 1 row. Continue knitting with an openwork pattern. Knit 1 whole repeat and the first 6 rows of repeat. Close all loops.
Make a seam. Thread a ribbon or cord through the holes and place a bow in the middle.
10 Oversized booties
They are good because they are knitted on 2 needles and do not have a specific size, that is, they can stretch as the child’s legs grow. You can knit with different finishes on the top, the main thing is that the lower part is knitted with English or semi-English elastic.
Upper part and trace: knit on 1.5-2 mm knitting needles, semi-English rib on 2.5 mm knitting needles Main part. Cast on 41-45 loops, knit 3-5 cm with elastic 1x 1. In the middle part, select 9-11 loops and knit a rectangle with garter stitch, approximately 2x3cm (16 rows). On the sides of the rectangle, continue knitting from the edge loops. In the corners of the front part, for the required volume, knit 3 loops from one. We knit 1-2 rows with an elastic band 1*1, switch to 2.5 cm knitting needles and knit 3 cm (-14 rows) with a semi-ant line and an elastic band (1 row - 1 l, 1 yarn over, 1 slip without knitting, 2 row - 1 purl, 1 l knit together with the yarn over). We knit the last 6-7 rows with a 1x1 elastic band, moving from the 3rd – 4th row to thin knitting needles. We collect open loops, starting from the middle of the knitting thread, alternating one on the right and on the left. We tighten it approximately halfway and sew the back seam. Insert a ribbon (for a thin satin ribbon it is not necessary to knit holes). Finish 1. Pink lace: Already on knitted booties, pick up loops along the top of the knitting and knit lace (1 row - 1 l, 1 yarn over, 2 row - back and forth, repeat 2 times and close with knit stitches) Finish 2. We start knitting turquoise booties with finishing: We knit the cloves 4 rows - in stockinette stitch, 5th row - 1k, 2 knits together, 1 yarn over, 6th row - purl, 4 rows - in stockinette stitch. For the pattern - 1 purl row, 7 rows of stockinette stitch with white thread, 2 purl rows. Then we continue to knit booties according to the description. On a white strip, the design is embroidered with colored thread, imitating knitting loops
I wish you to choose suitable booties!
Clothing for children should be as comfortable and safe as possible. Unfortunately, purchased items do not always meet these requirements 100%. You need to be especially careful when choosing clothes for newborn babies. Everything is important here - style, material, workmanship. In this article we will take a step-by-step look at how to knit the first shoes for a child - booties. When choosing yarn for work, give preference to natural threads with a natural color. It is better to knit booties with knitting needles for beginning craftswomen, starting with simple patterns. Be sure to tie the sample, wet it and dry it. After washing, items knitted from natural yarn “shrink”, decreasing in size. Therefore, it is better to calculate the knitting density on a dried sample. Or there is a second option - to knit shoes of a obviously larger size, taking into account future shrinkage. See below for approximate baby foot measurements.
There are many knitting options - on two, five knitting needles, crochet, a combined version - knitting needles and crochet hook. Let's start with the simplest model - booties - shoes.
Shoes - unisex
These simple booties are suitable for both girls and boys. It is designed for a baby of 10-12 months.  We will need:
- yarn of one color – 50g;
- a little yarn of a different color for the lace;
- set of socks No. 3;
- hook for tying lace.
Patterns used:
- elastic band 1 knit x 1 purl;
- stockinette stitch - in straight knitting, odd rows - knit, even rows - purl. P.;
- shawl pattern - with straight knitting, all rows are knitted. P.
Description and master class
We will work on 5 knitting needles, in two threads. Cast on 37 stitches and move on to circular knitting, placing 9 stitches each. on each sleeper At the same time, we knit the first and last stitches with one stitch. Continue with an elastic band 12 rubles. Then we make a row with holes for pulling the lace. To do this, alternate 2p. together in 1 person, 1 yarn over. Let's move on to faces. smooth stitch and knit 2 r. At the same time, we redistribute the loops on the knitting needles: 11, 7, 11, 7 loops.
Further work will be shown step by step - see master class and photo.
Toe
Knitted at 11p. one knitting needle. 18 rub. We do it with a scarf pattern.
 Side parts
It is knitted on 25 set aside loops, plus on the sides of the toe we cast on 9 loops on each side. We make 10 rubles. scarf pattern. 
Sole
Knitted on 11 central stitches on the toe of the faces. satin stitch In this case, we knit each of the outermost side loops together with the loops of the side part. Continue until the side sts are completed.  Loops with two sp. transfer to one, alternating evenly. We close all sts, knitting them in threes.
  Cut the thread, fasten, and carefully tuck in the end.
  Now let's decorate our children's shoes. To do this, tie a lace and tuck it through the holes of the shoe. We tie beautiful bows. The shoes are ready!
White booties with a pattern: video master class
https://youtu.be/wzB_VKyHCnw
“Caramels”
This master class will help you knit the most original and comfortable shoes for your little princess.  Dimensions are calculated for the feet of a one-year-old child.
To work you will need:
- yarn of two colors - only about 50g;
- set of sp. No. 3;
- beads and flowers for decoration.
Patterns used:
- garter stitch - all stitches;
- two-color elastic band, knitting in the round:
Row 1: *k1, purl 1* – until the end of the row;
2 rows: *Slip 1 p., 1 yarn over, 1 p.* – whole row;
3rd row: * knit the removed loop together with the yarn over, purl 1* – the whole row.
Description and master class
For “Caramel” booties, the sole is knitted first. The rest of the shoe is tied to it. Our detailed master class with photographs and descriptions is at your service!
Sole
We dial 8p. the first color (in our case, white) and knit it with a scarf pattern, making increases - see the diagram in the photo. One cell corresponds to 1 p. and 1 p.
 Side parts
We lift the loops along the edges of the sole and distribute them into three sts: 21 sts. on the sides and 18p. on the toe - only 60p.  Let's move on to the second color, in our case pink, and knit a row of faces. loops
  From the second row we knit 14 r. two-color elastic band.
  16p.: white yarn - 15 knits, 2 knits. – 1 person – 15 decreases, 15 faces. Ours is 45p.
from 17th to 21st. - shawl pattern with alternating colors.  Close off all sts except 20 sts. on the heel.
On these 20 sts, knit 2p. persons.p.
Dial another 20p. for the strap. At 40p. knit 8 r. Don't forget to make a hole for the button. Close the loops. Cut the thread and carefully thread the end. Make the second shoe a mirror image. You can decorate “Caramels” as you wish - with beads, flowers. 
Summer booties: video master class
https://youtu.be/LVOvYG4iBCk
Ugg boots
We suggest you knit booties with an original pattern - ugg boots. 
The model is designed for a foot size of 11cm - see master class.
We will need:
- white yarn – 50g;
- some threads in two shades of brown;
- set of sp. No. 2;
- hook No. 2.5;
- needle with a large eye.
Patterns used:
- persons satin stitch: when knitting straight - odd rows - knits. p., even - purl; when knitting in the round – all sts – knits;
- “rice” pattern: alternate 1 face. from purl 1, in the next row we shift the pattern by one stitch.
Description and master class
We start knitting from the sole. For these boots it will be double, so that knitted ugg boots are warmer and more comfortable. We crochet with a white thread 18 VP plus 3 VP for lifting - see the diagram in the photo. 
We will knit three rows according to the pattern, in the 4th row we will knit 72 s/n stitches without additions. We do not cut the thread. Similarly, we will make the sole from dark brown yarn.
Ugg top
We collect 72 stitches along the edge of the white sole. and we will complete 5 rubles. persons Ch. We outline 21 stitches for the toe of the boot. Next we will knit in the round. The loops of the side parts and the back are simply knit, and the loops of the toe are according to the pattern:
6p.:*2p. in 1 person., 1 person.* – 7 repetitions. Total – 14 p.;
7r.: according to the drawing;
8p.: 7 times 2p. in 1 person;
From 9th p.m. the scheme changes:
Knit the loops of the side parts and the back without finishing 1 stitch. to the toe, knit it together with its outer loop, k5, 2p. in 1 person 10th r. -similar. We will knit the reverse row, turning the work.
11p.: remove 1 p., 5 p.., 2 p. in 1 purl. (grab 1 stitch from the side stitches) Turn the work.
12r.: 1p. remove, knit 5, 2 p. in 1 person U-turn.
From the 13th. repeat the 11th and 12th rows three times.
Ugg tongue
We knit it at 7p. toe, casting on an additional 1 stitch on both sides. It turns out 9p. We knit 8 cm with a “rice” pattern and close the st.
Bootleg
We knit on the side loops of the faces. satin stitch 32 rub. In the 33rd and 34th r. To create a rounding, close on both sides twice, 2 stitches each. At 35 rub. close all the loops.
Decorate ugg boots with embroidery - see diagram. 
Assembly
Using a RLS crochet hook, tie the tongue and sides of the boot - 2 rows. Make 4 loops for lacing on the boot: 4 ch for 1 st. grounds. Tie the top with a crayfish step. Weave a lace - a braid of 4 threads. Sew on the second sole, leaving the raised edging of the white sole visible. Thread the lace and tie a bow.
Doggy booties on two knitting needles: video master class
Booties - sneakers
We invite you to knit the simplest, but very original children's sneakers. 
To work you will need:
- yarn of three colors - white, blue and carrot - approximately 50g each;
- set of sp. No. 3;
- hook No. 2.5.
Pattern used:
- garter stitch: when knitting straight, all stitches are knit.
Description
Cast on 6 stitches in two white threads and knit 7 stitches, adding 1 stitch to each even row. at both sides. In total we get 12p. We continue 34 rubles. with an even canvas, then decrease by 6 stitches. - mirror the increase.
Raise along the edge loops 58p. Knit 2 p. in the round. garter stitch. Then from the middle of the backdrop in one direction 23p. we knit in blue, in the other - 23p. carrot, sock – 12p. – white. In places where you change to a different color, cross the threads so that there are no holes. You need to knit 10 rubles. To decorate the toe, decrease 5 times on the white area, 1 stitch on each side. Close 13p. on blue, 2p. on white, 13p. on carrot plots. On the remaining loops of the blue and carrot sections (10 stitches each, 20 stitches in total), knit two rows in white with a garter pattern. Close the loops.
Assembly
Crochet two laces from white threads - 140 VP. Thread them through and tie bows. Knit decorative balls for decoration - two blue, two carrot. To do this, make a chain of 6 chain stitches with a crochet hook, connect them into a ring. Knit 15 columns of s/n into the middle. Tie the outer edge next to the sc. Sew on the balls based on the photo. The sneakers are ready!
Mouse booties on two knitting needles: video master class
As you can see, knitting booties with knitting needles is a very real and very exciting task for beginner knitters.