We loved the floral theme so much last year:
that my daughter and I decided to do something similar this year.
We needed:
1. Foamiran, also known as FOM, A4 format (sold in craft stores): 1 sheet of each color: green, pink, orange and blue.
2. Scissors
3. Hot glue gun
4. Simple soft pencil
5. Ruler
6. A sheet of plain paper for drawing patterns
7. A stable suitable glass for something or you can make a glass vase from FOM, as in our case.
8. A piece of plasticine on the bottom of the vase for stability and sticking a skewer
9. Kebab skewer
10. Rhinestones, ribbons, confetti, etc. Easter-themed decor
The flower arrangement was made according to MK from the Internet:
We measure out strips 1.5 cm wide on a green FOM as in the photo, the lower part is about 5-7 cm:
Cut to a horizontal line: 
Glue with hot glue: 
We twist and secure the composition with glue: 
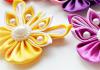
Draw and cut out a template of a flower and its center from paper. Then we transfer it to FOM. We made 9 flowers. We glue the centers to the flowers, and then the flowers themselves to the blank in random order. 

Next, we decorate the bouquet on an Easter theme to your taste; we additionally made and decorated a glass from FOM, at the bottom of which we placed a piece of plasticine. We made an egg from FOM, glued it onto a skewer and stuck it into the composition.
Our result:

It took us 1 hour to complete the whole craft and another 15 minutes to discuss the project, prepare the work area and clean it up at the end. The daughter very actively marked the green sheet, and then glued all the parts, i.e. she took an active part. We worked with foamiran for the first time and immediately appreciated the advantages of this material: it doesn’t tear like paper at the slightest mistake, if you glue it wrong the first time, you can fix everything, it holds its shape well, it’s great for children’s creativity
Making Easter crafts from foamiran with your own hands is as easy as shelling pears. To do this, you need to carefully read our article and apply the acquired knowledge in practice. Sit back comfortably: we will teach you how to create real miracles!
What is foamiran
– a modern material intended for making handmade products. Often, needlewomen call it suede or revelour, which is not surprising, because the material feels like a soft, velvety fabric. Foam is found on sale in the form of thin sheets of all colors of the rainbow.
 Distinctive feature The material is that with slight heating it acquires plasticity: the sheets can be easily sculpted. The material is porous and is not afraid of moisture, so foamiran crafts can be wetted and wiped with damp wipes. Color the product will not be damaged and the shape will not change.
Foam sheets are presented on the Russian market Iranian And Chinese production. If you decide to make a craft from this material, pay attention to Iranian plates.
Important features of foamiran things to consider before going to the store to make a purchase:
- The material is available in more than 20 different shades.
- Easily tinted and painted with acrylic and oil paints.
- Cuts with scissors and a stationery knife, easily pierced with an awl or hole punch.
- Foam allows you to create embossing of various types.
The most important advantage of the material, which will undoubtedly determine your choice, is that foamiran is safe for children and can be used in crafts for the youngest residents of the house.
Flower baskets for eggs
 We present a master class prepared by an excellent needlewoman Marietta, who knows foamiran like the back of her hand. To make the same gorgeous basket, prepare the following: tools and materials:
- Several multi-colored sheets of foam.
- Flower templates (you don’t have to look for ready-made stencils, you can draw flowers by hand and use them in handicrafts).
- Glue gun and scissors.
After everything is prepared, get started to the cart creation process.
 Transfer prepared flower template on foamiran. Cut it out. Make a basket as shown in the photos.


 Go ahead to the flower basket stand: after cutting, be sure to color it with a felt-tip pen or marker. You can limit yourself to the usual leaf veins or create your own unique pattern. Apply a drop of glue to the center of the stand and attach the basket. Squeeze with your fingers gluing area, hold for a few seconds for better adhesion.
 Do handle and bow. The handle can be made in the form of a simple rectangular strip or made into a curly one. A template of stunning bows for decoration can be viewed at

 That's all: A wonderful basket for Easter eggs is ready! It is suitable not only for home decor, but also as a gift for family and friends. After the holiday is over, use the basket to store small items.
 Easter egg from foamiran
We bring to your attention another interesting master class on making an Easter egg from terry foamiran from Popova Natalia Nikolaevna. Prepare materials and tools:
- Terry foamiran of any color (when using a yellow sheet, an Easter egg can easily be transformed into a cute chicken).
- Foam egg.
- Glue gun and scissors.
- Decorative elements to choose from: beads, ribbons, lace, beads.
- Eyes, nose, mouth from a craft store.
 How to do
Let's start creating pretty Easter crafts from foamiran.
 Spread a sheet of foam on the table and cut out two pieces the size 12*12 cm. Heat them (one at a time) on the soleplate of the iron, apply to the bottom and top of the egg. Wait until the sheets deform and take the desired configuration.

 Glue the resulting blanks to the foam part using a glue gun, trim off the excess.


 Close the joint: to do this, cut a rectangular strip 1.5–2 cm wide and slightly longer than the egg’s circumference. Cut the strip into fringe and glue it to the joint. It turned out to be a nice skirt.
 Glue on the eyes and nose. Decorate the egg as you wish using lace and ribbons. You can place a crown on the sharp end of the egg.
Sustainability Add to the craft using a special cardboard stand. To do this, cut out a rectangular blank and glue it into a ring. Decorate the cardboard stand with beads or simply tie it with a ribbon that matches the design.
Templates for crafts from foamiran
To make your creative evenings comfortable, we suggest downloading templates for Easter crafts from foamiran from our website. We have prepared a magnificent selection that will not leave any magician indifferent. The proposed Easter crafts are simple and can be done by children. Please note: If a child is involved in the production of wonderful products, you must constantly be in the room and monitor the baby’s actions. Provide him with safety scissors and do not allow him to work with a hot glue gun or iron.
Before finishing the article about crafts made from wonderful plastic sheets, we would like to advise you to supplement them with Easter greetings. Write kind lines on special forms located at. You can also use postcards that are waiting
The product can be packed in a box. The template is located
We hope you enjoyed the master classes presented on our website page. We are waiting for you to visit us for other crafts!
Easter is coming very soon, and children love it very much. Firstly, because this holiday is very tasty and bright. On this day, the tables are always full of various delicacies - these are soft buns that melt in your mouth, sunny cheesecakes, and much more. And of course, we haven’t forgotten about, which you can use to fight and win tournaments in this simple activity.
This holiday also becomes memorable because many people want to do and make some kind of holiday craft with their own hands. And once you get the hang of it, even a few. These include baskets for eggs, eggs themselves, various stands, cute figurines of chickens and Easter bunnies. And also postcards.
Kids love to make different things from paper and various scrap materials. If their mother, grandmother, or older sister, or maybe even their father or older brother helps them, then they can do this for hours.
Crafts are now made in kindergartens and schools. And if in the garden, kids take their first steps under the guidance of a teacher, then in schools they even give homework assignments to create something for the holiday with their own hands. And then mothers begin to look for something interesting and original to do.
In today's article we will look at various ways to make various cute little things that can be made quickly and easily. Just a little perseverance, and your hands will make a cute craft that you can give to your family and friends, as well as congratulate teachers and educators with its help.
It will take no more than 5 minutes to make such a simple and at the same time necessary and beautiful egg basket. It will be made in the origami style beloved by many.
Any student can cope with this task. It just takes a little effort and perseverance. But what a great holiday gift you can make.

We will need:
- sheet of double-sided colored paper
- stripe in contrasting color
- scissors
Manufacturing:
1. From a rectangular sheet of paper, we need to cut a square. To do this, fold the sheet diagonally, connecting the two edges. It looks like two triangles are formed, folded together.

2. Cut off the excess piece of paper.

3. Expand the square. Now we will need to tuck all the corners to the center. There is no need to rush; all newly obtained triangles should be the same size and accurately connected at the central point.

Each internal figure folded into a triangle, and the overall result was a double square. We turn it over to the other side, that is, with the curved ends down.

4. The next step is to fold the edges up again, connecting them in the center.

You should end up with triangles, but with a cut in the middle.

5. Form the bottom of the paper basket. To do this, bend each corner to the opposite edge. Iron the fold line very well.

You should get a figure like this.

6. Turn the workpiece over again.

Roll each of the 4 squares into a triangle.

7. Now let’s give the workpiece the appearance of a basket. To do this, lift each corner up and bend it to form a three-dimensional shape. Then slightly lift the edges to form a box inside.

We iron the inner seam along the perimeter of the square with our finger to more clearly define the shape.

8. Now we need to make a handle. To do this, take a prepared strip of contrasting paper and cut a strip 1 cm thick. To make the handle stand out, it can be carved. To do this, you will need to cut the strip not with ordinary scissors, but with curly scissors.

9. Coat one side with glue and stick it onto the remaining red paper on one of the long edges. Cut a long strip with a total thickness of approximately 1.5 - 2 cm.

10. Inside the basket, or rather on its wall, there is a slot where you can insert the handles from the basket. And to create a more durable fastening, it is better to lubricate the edges with glue.

This will make it easier and stronger to hold on. After all, we will put an egg in the basket.

11. The basket can be further decorated. To do this, cut out small oval circles and paint them, just like you paint eggs. Glue on the bases of the handles and on the sides.

This is such a beautiful craft that resulted. You can put a painted egg in it, or something else, such as candy or cookies.
Easter craft from cotton pads for kindergarten children - easy and quick
Any child who knows how to hold scissors in their hands and draw faces can make this craft as a gift for their parents. The craft is original, very beautiful and uplifting.

And it’s very, very simple to do.
We will need:
- cotton pads
- a piece of bright fabric
- bow
- small plastic spoon
- felt-tip pen
Manufacturing:
1. Draw a perky face on the convex side of a regular white plastic spoon.
2. Cut long ears from cotton pads or pieces of white felt. Glue liners of a bright contrasting color into the middle, cutting them out of fabric.
3. Glue cotton pads on both sides of the spoon handle, thereby forming a body. Glue on the bow.
That's it, our bunny is ready.
To decorate a gift, plant grass in a bowl in advance. In a week she will grow up so beautiful and green. Stick the end of the handle into the ground, and the gift is ready!

It looks absolutely amazing. I can’t even believe that a small child could make such a craft.
Original craft made from felt and thread “Easter Bunny” (for students of grades 2 and 3)
You can make such a cute rabbit from threads and felt.

After reading the description, you will be surprised how easily this can be done. So get your materials and tools ready and let’s get started. And if you encounter difficulties, then ask your mother for help.
We will need:
- bright thick threads for knitting
- chenille wire
- eyes
- scissors
- hot melt adhesive
- cardboard
Manufacturing:
The technique for making such a cute toy is based on the ability to make pom-poms for hats. And if you know how to do this, you can do it without difficulty. And if you don’t know how, then learn to do two things at once.
1. To make a pompom, we need a piece of cardboard. From it you will need to cut out a round shape like this with a notch. To make the shape more durable and not bend, you can make it double by cutting out two templates. Their size should be 11 cm in diameter, with an inner circle of 3 cm.

2. Prepare thick, bright threads for knitting. Starting from the middle of the mold, wind the threads around it.

3. Cut them into two equal parts along the cardboard line.

The result will be such a fluffy preparation.

4. Then cut a piece of thread 30 centimeters in length, and insert it between the cardboard blanks and tie it tightly. Then remove the cardboards.

5. Trim the resulting pompom by aligning the threads to the same size. Cut off any remaining tail.

6. Cut out the paw parts from felt. To do this, we will need two pieces of material measuring 4x6 cm. Cut two ovals from them. Glue them with hot glue.

7. For the ears we will need more felt, two pieces measuring 6x2 and one strip of another, lighter color, 7x1.5.

From two strips of dark color, cut out two pointed ovals, giving them the shape of ears.

Fold the white strip in half and cut out the inside of the ears from it.

Apply glue to one of the ends and fasten both parts to make the ear voluminous.

8. Spread the threads on the pompom and glue the prepared parts. Use glue to glue on the eyes. They are purchased from us.

9. Cut the chenille wire into three equal parts.
Chenille wire is wire wrapped in lint. It is fluffy and bends perfectly.
We will make antennae from it. After cutting it into pieces, connect it in the center and twist it relative to each other so that it holds. Glue onto the pompom.

10. Cut out a round piece from felt that will be the spout. Glue it.

Let the toy dry. Everything is ready and very beautiful!
Easter egg using paper quilling technique for a school competition (master class)
And such a chic egg can be made using the quilling technique. With its bright and colorful appearance, it will certainly attract the attention of a strict jury, and they will linger near it for a long time, admiring its beauty. And maybe they will be awarded first place for this work.

This work requires accuracy, attention and a desire to achieve results. And then everything will certainly work out.
We will need:
- quilling paper
- PVA glue
- glue brush
- scissors
- pen refill
Manufacturing:
1. First, we need to stock up on eggs. This may be a product made of plastic or other material. But if this is not the case, then you can use just a hard-boiled egg for the mold.

You need to stick a thin strip of paper on it in the center, wrapping it around the egg twice. Glue the edges with glue.
In order for the glue to better hold the elements together, pour a small part of it into a mold, or simply onto a piece of cardboard. It will thicken slightly and will glue faster and better.
2. Also prepare paper. Ready-made quilling kits are sold. Today we have prepared a set of 3 mm thickness. This size will be ideal for a small egg, and the craft will look neater.

If you can’t find a set, you can buy double-sided colored printer paper and cut it into thin strips of the desired width and the same length.
3. First, you need to twist the blanks from strips of paper. To do this, take one of the strips and coat one edge with glue, then carefully screw it onto the rod. Try to ensure that the loops do not fall off and are positioned strictly one above the other. The more accurate the workpieces are, the more accurate the final result will be.

For one workpiece, wind one strip of paper.

4. Then remove the curl, put it on the table, and let it unwind a little to make it look more beautiful. It will also be easier to make leaves and petals from such a blank.

Place each subsequent workpiece on the table next to the previous one and allow it to unwind to an equal size. When this happens, fix it with glue, covering the edges.

Think over the design and colors. That is, how and in what color scheme you will get the craft.
5. We begin to decorate the egg from the center, namely from the base that we have already glued earlier. You can glue the blanks in the form we prepared them. Or you can give them the shape of a leaf. To do this, take the workpiece from both sides, stretch it to the sides and lightly press the edges to form a corner. You will get a figure like this.

Glue the first one onto the green strip of the base, then apply glue to the area next to it and the side of the first piece, glue the second one next to it, then the third one, and so on in a circle until the very end.

Let the first row dry thoroughly. To dry, it is better to place the egg on a stand. A cap from any plastic bottle will do for this.

6. Then move on to the second row. And while the first one is drying, we begin to twist the blanks for it. Choose a different contrasting color for this. We also give them the shape of a petal. To do this, squeeze the edge of the circle only on one side.

7. Place the second layer not in a row, but through one green leaf. Glue to the side of the leaves. Align so that the egg shape is maintained. And let it dry completely again.

8. In the meantime, while our beauty dries, roll up blanks of a different color. And give them the shape of leaves again, pressing them on both edges. Then fill in the empty spaces between the pink petals.
Then twist more circles and stick them next row. Give each row the opportunity to dry. And you can also fix them with rubber bands.

9. For the top, take a different color, and twisting the rounds, fill the empty surface with them.

Let the glue dry completely. Then carefully remove half of the craft from the egg.
10. But first you need to draw the tops of the lower half on the egg with a felt-tip pen. So that we do not make a mistake with joining the parts at the last stage.

While the first half was drying for the second, we had already prepared leaves, petals and circles. And by analogy with the first part, we repeat the same thing. You can use the same colors, or you can make them different and in a different order.

11. After drying, remove this half and glue both parts.

12. Then we make a stand and place our beauty on it.

But really, look how beautiful the egg turned out! “Live” it looks even more attractive.

Don't be afraid that you won't be able to repeat the result. The most important thing is to have patience. If it doesn’t work the first time, then go back to the stage where the error occurred. Fix it and everything will go swimmingly.
And there is one more small piece of advice. If you are making a quilling-style craft for the first time, then wrap the egg in cling film. And when you make the first part and fix it with glue, the film can be removed. The same can be done with the second part.
This will make fixing the parts easier.
Video on how to make a foamiran basket for decorated eggs
Working with a material such as foamiran requires accuracy and perseverance, especially when you make any small parts from this material. These are usually flowers and leaves. If you want to make them look like real ones, then in addition to careful cutting, you also need to diligently decorate every small element. Then combine them all into one composition.
And today’s craft is much easier to do. Although it also requires diligence and accuracy. This video shows how to make an Easter basket from foamiran. A beautiful pattern and accuracy in cutting out the pattern - and success will be guaranteed to you.
And if you also decoupage eggs using napkins and place them in a basket, it will be so beautiful that it will be difficult to look away.
If you make such baskets a little smaller, and put 2 - 3 decorated ones in each, or , then it will be nice to go on a visit with such a gift and present it. The recipient will be delighted with such beauty.
And the main thing is that even children in grades 2-3 can make such a craft, not to mention older children. Of course, younger children can make such a basket with the help of their mother or someone older.
DIY holiday card is easy and simple
This card is also easy to make yourself. Especially if you have a couple of ready-made felt figures. Or they can be replaced with cut out paper figures on the appropriate theme.

A postcard with good wishes will be a welcome gift for Easter.
We will need:
- double-sided colored cardboard
- contrast colored paper
- ribbon
- two felt figures
- double sided tape
Manufacturing:
You can choose the size and shape of the postcard yourself. And we will make it in the shape of an egg.
1. Cut out a folding egg shape from double-sided colored cardboard so that you get two halves on the spread. Subsequently, you can write a congratulatory text inside.

2. Then cut out a slightly smaller egg shape from contrasting paper.

3. Wrap it with ribbon crosswise.

Tie a beautiful bow on the front side. It is desirable that the color also differs from the main color of the postcard.

4. Attach double-sided tape to the wrong side of this part on four sides.

And glue the detail to the top of the future postcard.

5. Now all that remains is to glue the felt figures and the card is ready.

She turned out so beautiful!

Inside you can write a congratulation for the person to whom it is intended.
DIY Easter crafts made from pasta
If you want to make a beautiful and original thing for the holiday, you can make it from ordinary pasta. You get true pleasure and satisfaction from the very process of making this or that craft. Because the end result always amazes with its exquisite beauty.

Recently, some works have already been elevated to the rank of art. They make tea sets, luxurious vases, and formal candlesticks.
However, children do not lag behind, and also make simple, beautiful vases, coasters and decorate eggs for Easter.
To make any product, different execution techniques are used. Balloons are widely used. They are inflated to the desired size and then decorated with pasta using glue. After the glue has dried, the ball is pierced and removed. But the shape given from the pasta remains.

The second way is when using dishes. For example, a cup, saucer, or bucket. It all depends on what shape you would like to get in the end. The dishes are wrapped in cling film, and the future product is formed on it.

Then, when the product is completely dry, it can be removed from the used dishes.
Sometimes the product is left in the same form as it was made, but most often it is painted in various colors. Gold and silver colors are especially welcome in coloring.
Flour products of different formats, sizes and patterns are often used.

This allows you to create simply gorgeous masterpieces.

It's very nice to make such a beautiful thing. It would seem that what is wrong, some ordinary pasta?! But look how beautiful it turns out. It will be a pleasure to decorate your home for the Bright Holiday with such souvenirs, as well as make a present to your friends or loved ones.
Video on how to make a craft from scrap materials in the form of Easter cockerels
Skill and dexterity, wonderful ethnic music and just a little time, and these are the results of such beautiful Easter toys. And agree, everyone can repeat it. All you need is a little free time and desire.
Very beautiful, bright, colorful and positive cockerels can be used as an egg stand.
It may be a bit difficult to make these for small children, but they will undoubtedly want to take part in coloring them. And older children, of course, can handle it on their own.
In today's article, I tried to collect simple ideas for making various holiday cards and cute little things. Children can do all of them. And if at any stage they may have difficulties, then adults will always be able to help them. It’s even better that children do all the work together with their parents or older brothers or sisters.
Such joint work brings souls together, and what could be more important. Especially on such a wonderful spring holiday as
Happy Holy Resurrection to you. Give each other love and warmth, and at the same time little pleasant signs of attention in the form of cute gifts.
All the best!
Bead is a project dedicated to beads and beadwork. Our users are beginner beaders who need tips and support, and experienced beaders who cannot imagine their lives without creativity. The community will be useful to anyone who, in a bead shop, has an irresistible desire to spend their entire salary on bags of coveted beads, rhinestones, beautiful stones and Swarovski components.
We will teach you how to weave very simple jewelry and help you understand the intricacies of creating real masterpieces. Here you will find diagrams, master classes, video tutorials, and you can also directly ask advice from famous bead artists.
Do you know how to create beautiful things from beads, beads and stones, and do you have a solid school of students? Yesterday you bought your first bag of beads, and now you want to weave a bauble? Or maybe you are the head of a reputable print publication dedicated to beads? We need you all!
Write, talk about yourself and your works, comment on posts, express your opinion, share techniques and tricks when creating your next masterpiece, exchange impressions. Together we will find answers to any questions related to beads and bead art.
Natalya Nikolaevna Popova
Good afternoon, guests of my page. I suggest Easter egg master class from foamiran.
To make a cute egg we will be needed:
Terry - foamiran(color of your choice, foam egg, glue gun, small parts for decoration, eyes, nose.

Cut from foamiran two blanks measuring 12 x 12 centimeters

We heat the pieces one by one on the surface of the iron, stretch them onto one half of the egg, then onto the other half. We wait until they take the shape of an egg.

We also glue the blanks to the egg one by one with a hot glue gun.
Carefully trim off the excess foamiran.
Then glue the other half.


It turned out like this egg.

Cut a strip from foamiran two centimeters wide, slightly longer, for the junction of the egg parts. We cut the strip along its entire length, being careful not to get close to the edge
(can be cut off)

We apply this strip to a hot iron so that the cut strips bend a little. Glue this strip to the joint. Then we glue the eyes and beak.

It turns out so cute egg.

(You can decorate with additional details at your discretion)
Egg You can give it to your loved ones. Enjoy your troubles. Thanks to everyone who stopped by to visit.
Publications on the topic:
I bring to your attention another advanced master class for high school or additional education clubs. At the end.
March will soon end, April is very busy with various events, time is running out, so the children and I decided to prepare souvenirs in advance.
Today Easter is late and we have time to make something unusual to please our loved ones on this day. And with what, how.
For work you will need: Corrugated cardboard Colored paper Sequins of different colors PVA glue Scissors Sequence of work:.
Easter is the brightest holiday! And the egg, I know, is a symbol of life on earth! My dear friends, you already know that I really love decorating.
Easter is one of the most important and beautiful church holidays. The most popular symbol of Easter is the egg. I suggest making Easter.