A dress with sleeves for Barbie is clothing for a doll that can be easily made from a sock with your own hands. Like most clothing models for sock dolls, the dress does not require preliminary paper patterns. Another advantage of clothes for dolls made of knitwear is that it is not necessary to process the bottom of the product, sleeves and neck. For working with hand-stitched knitwear, the buttonhole stitch is best suited. A 7-8 year old girl can sew a dress with sleeves for her Barbie, if, of course, she already knows how to make simple stitches. Well, if she doesn’t know how, then teach her as soon as possible! After all, sewing clothes for dolls with your own hands is a very interesting and useful activity.
We suggest making a dress or blouse with sleeves from socks for a Barbie doll in two ways. We suggest doing all the seams by hand, without using a machine, to make it more comfortable for children. But you can also use a machine and make knitted seams on it. If your child is sewing clothes for Barbie from a sock for the first time, then try making more.
Dress with sock sleeves for Barbie doll. Method 1.

 This dress or jacket is made from the bottom of a sock for an adult.
Cut off the bottom of the sock.
Mark the sleeves of the sweater with chalk, soap or a water-washable marker.  Cut the sock along the marked lines.
  Make a cut at the top of the sock for the neckline.
  Hand sew the sleeves and sides of the doll's sweater using a buttonhole stitch. Turn the jacket right side out and you can try it on Barbie.
Dress with sock sleeves for Barbie doll. Method 2.
 This dress is made from the top of a sock. It is desirable that the elastic band on the lapel looks beautiful.
  Cut off the required length of the doll's dress.
  We outline the lines of the sleeves. If you are planning to make a blouse with long sleeves for a Barbie doll, then the sleeves will most likely be longer than the blouse itself. But the length of the clothing can be adjusted later.
  We make cuts along the marked lines.
  Sew the sides of the garment.
Turn the dress right side out and try it on.  We bend the bottom of the doll's dress and hem it with straight stitches from the inside out.
  We bend the neckline of the dress halfway to the front side and hem it with straight stitches.
To complete the dress, you can make a belt for a Barbie doll from thin cords (threads).

For such a belt you will need thin cords (threads) of two colors, approximately 0.5 m each, and a button with fairly large holes.  We fold one of the cords in half and make a loop, tying a knot, the button of your choice should go into this loop.
  We insert the second cord into this loop and begin weaving in 4 threads.
In every family where there is a little girl, or maybe not so little, there is a Barbie doll. And perhaps even several, and they are all constantly in the game: they go shopping, visit each other and, of course, attend balls and restaurants. And for this they need a lot of outfits, so doll owners are puzzled about where to find a dress for Barbie. The easiest option would be to make such an outfit with your own hands; it will not require large financial investments and the dress will be the most unique. The image of the dolls can be made very diverse: it can be a beautiful young lady in an evening dress, or it can be a business girl in a simple dress. The most important thing here is to please your little beauty, because by playing with dolls, the girl develops her own taste and imagination.
Let's start simple
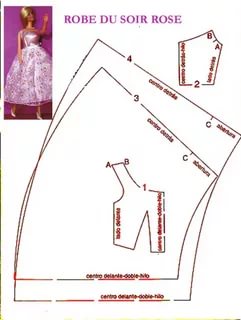
Life-size patterns can help in this matter. To begin, select all the starting materials: suitable fabric, ribbons, rhinestones, lace, threads. Then make life-size patterns; ready-made patterns on the Internet will help with this, or you can draw them yourself. The easiest way would be to attach any fabric to the doll, make notes, and then transfer the pattern to the fabric. But for a dress, especially if you plan to make a lush evening dress, it is better to use ready-made patterns.
Next you need to move the patterns onto the fabric and cut them out. Don't forget to leave seam allowances, otherwise you won't be able to put the dress on the doll, it will be very small. Then you sew the pieces together, finish the seams, insert a lock or sew on buttons. Well, then how your imagination works, we decorate it to your taste. This is where all the extra beautiful little things come in handy. If you don’t get too fancy with sewing a dress, it will only take you half an hour.

The dress can also be made from a sock. This is a very easy way to sew a dress, even a child can handle it. It can be sewn with sleeves, or without them. Without sleeves it will be looser, but with sleeves it will fit the doll's figure. To sew a dress from a sock, you do not need to make patterns, and you also do not need to process the top and bottom of the product. It will be enough to process the armholes of the sleeves if you are sewing a dress without sleeves, since untreated they will not look very neat. A loop stitch is more suitable for joining parts; it is not necessary to use a sewing machine. The dress can be made from the top, or from the bottom of the sock. Let's consider both options.
In order to sew a dress from the bottom, you need to cut off this part of the sock. It is advisable to take an adult's sock. You need to outline the sleeves of the future dress and cut along these lines. Then make a neckline; to do this, cut off the top of the sock. Sew the sleeves and sides of the dress using a buttonhole stitch. Now we turn the dress inside out and try it on the doll.


Method 2
This dress is made from the top of a sock. The elastic of the sock should be neat and look beautiful.

Cut off the required length.

Now mark the lines of the sleeves. If you want to make a dress with long sleeves, then adjust the length after trying on.

But then you can just roll up the sleeves, it will also look good.
We make cuts along the lines we marked and sew them together with the same buttonhole stitch.

Now we can turn it inside out and try on our new outfit.

After determining the length of the dress, fold the bottom to the wrong side and sew with regular straight stitches. Next, we bend the neck of the dress in the middle, also on the wrong side, and sew it with the same straight stitches.

The dress is ready! You can add it to your taste.
Let's grab the rubber bands
For a variety of dress models, you can use Rainbow Lum elastic bands. This type of needlework has become very popular relatively recently, but many craftswomen are able to create not only bracelets, but also various models of toys, as well as a dress from rubber bands for Barbie. Such clothes turn out to be very original, bright with a unique design.
First you need to choose the colors you will work with and choose the most suitable way to weave a dress from elastic bands. It should be noted that weaving from rubber bands requires certain skills and a set of tools. However, this is not at all difficult to learn, and a weaving machine can be purchased at any craft store.
There are many ways to weave with elastic bands, but at the initial stage it is best to perform the product on a special machine. "Eight" is the easiest way to knit.
Let's look at it in more detail:

- You need to place several elastic bands in a row, stretch one rubber band through each second, repeating the figure eight, you will end up with two rows in the form of braids.
- Next, in the top and bottom rows we stretch 6 rubber bands (figure eight).
- Now you need to connect two rows with elastic bands, you need to put one in every second loop, but do not repeat the number 8.
- All steps must be repeated until the desired length is achieved.
If you have no idea how to weave a dress from elastic bands, then watch videos where skilled needlewomen will show you how to create such a dress without making mistakes.
Knitted outfit
A crocheted dress turns out to be very original.

If you know how to crochet, then this version of creating a dress will allow your imagination to run wild. Because there are a lot of ready-made models, the collection of which is constantly being replenished, at the same time you can come up with your own unique model. In this article we offer you a simple model of a beautiful dress and a master class with a description.

You will need:
- pink yarn, approximately 50 grams;
- white satin ribbon;
- hook;
- sequins (optional).

We crochet the first row with half double crochets.


When the top part is ready, connect the ends using a chain loop and start knitting the bottom part.
Sooner or later, a mother of a daughter has a moment when she turns into a fashion designer and starts sewing. DIY clothes for dolls.
I remember well all the outfits that my mother sewed/knitted for my dolls as a child. They seemed extraordinary to me, and the doll in them was the most fashionable and beautiful. And now I sew outfits for dolls myself, only now for my daughter.
How to sew clothes for a doll?
The simplest option is clothes for dolls made from socks! You can make almost any outfit from a sock: a dress, pants, top, skirt, shorts, hat. Today we will sew a dress and a tracksuit.
For this we need:
- two women's socks for a suit (I used terry ones);
- one children's golf shoe for a dress;
- matching threads;
- elastic thread;
- scissors;
- clear nail polish.

I'll start with our model. This is a girl doll, 34 cm tall - Jolina the ballerina ().

Using the proposed patterns, you can sew clothes for both a Barbie doll and a baby doll. It's all about the size of the sock :).
Clothes for sock dolls: tracksuit
Take a pair of women's socks. We will sew a blouse from one, and pants and a hat from the other.

Blouse for a doll made from socks
Trying the sock on the doll :). We attach it as in the photo (elastic band around the neck) and mark the place for the armholes.

The armholes should be under the elastic. We make two symmetrical cuts of the required length (about 2 cm) and try the sock on the doll again. Now in order to decide on the length of the sweater.
For a terry sock, treat the cut areas with clear nail polish to prevent them from falling off. We fold the bottom of the sweater and stitch it.
From the bottom of the sock we cut out two sleeves. To do this, measure the length of the arm, cut out a rectangle of the required length, and cut it lengthwise into two parts.

We get two blanks for the sleeves. We try it on and if necessary we cut off the excess. I cut the corners a little in the places where the sleeves will be sewn to the blouse.
Sew on the sleeve and the doll's blouse is ready!
Pants for a doll made from socks
We cut off the sock just under the heel. We try it on the doll to determine the length of the cut.

We make a cut and sew the parts together. Turn it inside out. The bottom of the pants can be rolled up or treated with clear nail polish.
Sock hat
The hat is sewn from the bottom of the sock. We try on the sock and decide on a long hat. Cut off the excess. We process the edges with transparent varnish. I turned up the bottom of the hat and stitched it with regular threads (as terry fabric frays). Then I made a basting stitch with an elastic thread and pulled it to the desired width so that the hat would not fly off.

We sew the top of the cap with a basting stitch and tighten it.
Now we try on the outfit on the doll and go for a walk.

Dress made from socks
We take a children's golf shoe and immediately under the rubber we make two symmetrical cuts. These will be the armholes. Carefully bend them or treat them with clear varnish. We try on the sock on the doll and determine the length of the dress. We cut it off. You can simply tuck the bottom, or sew on a beautiful braid.

The dress is ready.

How to process seams in clothes for dolls
- If your socks contain synthetics, you can cut them using a burner and a metal ruler. This way you won't have to process the cuts.
- If cutting with a burner is not possible, treat the cuts with a lighter or clear nail polish.
- The bottom of the parts can be treated with braid by gluing it to a hot glue gun.
The clothes from this doll are perfect for Paola Reina dolls. And vice versa.
Read the book ““ to the girls. She inspired Anyuta a lot. Teaches how to treat your doll with care and much more. She is gorgeous. Follow the link above for our review of it.
This is how easy it is to sew clothes for dolls from socks.
Clothes for dolls. Part 1Tights for dolls
let's take golf. measure the length of our doll’s foot and cut off the excess

measure the length of the leg and cut the golf in half to the desired height

fold our “foot” in half and round the corners to make the look more aesthetically pleasing

We do the same with the heel - it should turn out something like this


then we sew it all together. If someone has a modern miracle sewing machine with many functions, then by machine, but I sew by hand. The wrong side looks something like this


seam on the side like this

The result is like this

Overalls, pattern


Jacket made from sock

You will need: a pair of socks, a detachable zipper, thread and needle and glue.
Take the socks, cut off the top part and cut it as follows.

We get two sleeves and one large front-back piece.
We take a larger piece, bend the edges and sew on a zipper.

You most likely won’t get a small zipper, so we cut off all the excess, take glue and drop a few drops onto the ends of the zipper, otherwise the dog will come off.
We take scissors and make cuts (armholes) on the front-back piece, dividing it into front and back. Valuable advice from Bitter Apple
If you make such a jacket for a girl “with a bust,” then it is better to move the slits (armholes) to the back, so that the back is narrower than the front, and not equally (it is better to attach the part to the doll in advance and see where to make the armholes). So the clothes will fit better

The length of the cuts is equal to the width of the sleeve.
We sew together the shoulder seams and sleeves, we get something like this:

We sew in the sleeves.


At this stage you can basically finish. Sew around the neck and you're done.
For the hood, take the remaining part of the sock and cut it as follows:

bend along the edge

and sew it to the neck.

A hood made from the “sock” of a sock is not a very successful thing. in this place the fabric is denser, and it lies crookedly. so you can try to cut it out from the “middle” - cut out two pieces and sew them in half.
Pants for a doll

I often sew toys in trousers, this pattern is also suitable for pantaloons, “one pattern for all” does not suit me, so I make a separate pattern for each toy and sew according to it, which I advise you to do too. So we need sizes toys, in this case I have a donkey, using its dimensions I will show the construction of the pattern and sewing.
Pants length BE(I measure from the waist to the “floor”) -20 cm + 2 cm for the hem = 22 cm
Waist width AB(we measure where the waist is supposed to be) - I have 24:4 = 6 + 1 cm (for a loose fit and seam allowance) = 7 cm
Hip width SD(measured at the most protruding places - for me 29:4 = 7.2 (rounded up) = 8 + 1 (for a loose fit and seam allowance) = 9cm.
Landing length HP(we place the toy on the fifth point and measure from the waist to the “floor”) - I have 8 cm + 1 cm for the hem of the top of the trousers. = 9 cm
Now we take a sheet of paper (I have A4 format) and fold its length in half, start drawing from the fold, and then cut out the result, this is what I got


The next step is to fold the bottom of the trousers, I use adhesive web, I use it to glue the hem, it makes it neat and convenient, and then I sew it with a double stitch.


We sew the trouser legs, turn them inside out and iron them, and try them on for a toy.

This is what they look like after everything described above, rear view.

We put it on the toy and sew the unsewn part in place with a blind stitch. The result should be like this

You can sew on a belt, straps and put on a belt, but I have very thick, thick jeans and it would look sloppy, I also sew a pocket on the side, also original. In general, have fun.
Sweater for a doll or bunny

The advantage of this method is that it is very easy and quick to sew, you do not need precise measurements, and the result is impressive. The whole process takes about half an hour! You need to sew the sweater before you sew on the doll’s arms!
For this doll I needed a sweater in white and red colors. I chose this pair.
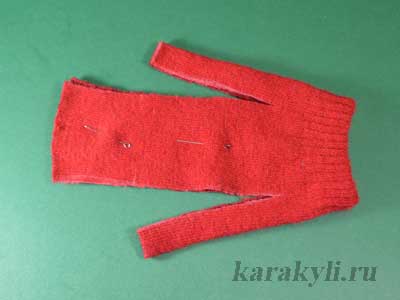
We cut off the part we need.


From one sock we will make the front and back of the sweater, and from the other - the sleeves.
Of course, we could have left it this way, but this drawing does not suit the image of the doll. Therefore, we will close the flower with a heart. We cut out a heart from red fabric (mine is fleece) and reinforce it with adhesive interlining or sickle tape.


We attach the heart to the front with a zigzag seam, having previously basted or chipped it with the sock (do not grab the back of the future sweater!). Fold and zigzag the bottom of the sweater.
Now you can try it on:


Let's do the sleeves. We turn the second cut sock inside out, attach the doll’s hands and trace the outline with chalk or pencil. Sew on a machine without cutting out parts. Please note that knitwear stretches very well, so the stitching must be laid slightly away from the intended lineinside. Just in case, you can try it on right away (no need to turn it inside out):

I found that the sleeves were a little long. And there were black stripes at the top, which seemed ugly to me. I added another line, slightly shortening the sleeves at the top. Tried it on - good! Now you can cut, turn and try on!

The last stage: we sew the arms in the sleeves to the doll’s body. I sew on two arms at once, piercing the body right through, and the arms only from the inside. We admire the result:


Summer blouse

To work you will need:
- fabric (preferably one that does not fray)
- ribbon or cord for ties

Operating procedure:
- Cut two pieces from the fabric, adding 0.5 cm to each cut for the seam and hem if the fabric is fraying. If the fabric does not fray, then you only need to add along the ABC corner.
- Place the pieces right side to right side and sew along the ABC side. Repeat the same on the other side.
- If the fabric is fraying, treat all cuts.
- Sew ties on the shoulders and ends of the sleeves. Lightly melt the ends of the ribbon so that they do not fray.
Dress "Strawberries and cream"

To work you will need:
- fabric (not necessarily in pink tones - you’ll just have to come up with a different name for a dress of a different color);
- linen elastic;
- sewing or lace on the collar;
- hook-and-eye clasp;
- decorative buttons for decoration (but this is no longer necessary - see below)

Construction of the pattern:
Part 1 is a rectangle, the width of which is equal to the width of the chest, and the length is the distance from the base of the neck to the bottom of the dress
Detail 2 - a rectangle of arbitrary width (but not less than 1 waist circumference) and length from the waist (or from the armpits - if the waistline is high) to the bottom of the dress.
Operating procedure:
- Cut out one part at a time, adding 0.5 cm on all sides to the seam on part 1, and on top of part 2 add 1.5-2 cm to the hem (the elastic will be inserted there), and 0.5 on the other sides cm on the seam.
- Fold the top of part 2 and stitch at a distance of approximately 1 cm from the fold. Insert the elastic band inside and secure it on both sides. (On the presented model, it was done a little differently: part 2 consists of 2 parts, each of which is assembled on top and processed with a roller, with a Velcro fastener at the back. But it’s easier to do it with an elastic band).
- Place pieces 1 and 2 right side to right, aligning the bottom edges of the pieces. Sew along the BN line. Repeat the same on the second side.
- Fold the bottom of the dress and secure the hem. If the fabric does not fray, this is not necessary. By the way, the hem can not only be secured with a seam, but also with the help of a “web” - something like double-sided interlining, put it inside the fold and iron it.
- Fold the sides of part 1 above the skirt and secure the hem.
- Now we’re making a collar: cut out of the fabric on the bias (i.e., diagonally relative to the weave of the threads) a rectangle, the length of which is equal to the girth of the neck plus 1 cm for the hem, and the width is 2-2.5 cm. You can simply take a piece of ready-made bias tape of the desired size length. Then take a piece of sewing or lace 1.5-2 times longer than the circumference of the neck and gather it along the upper cut. Then place the sewing and bias tape together, right side to right side, and place them on the right side of piece 1, on the top edge, lining up the middles. Sew along the top edge (it is better to sew from the middle or before sewing, fasten the parts in the middle with a couple of stitches so that they do not move). After this, bend the bias tape so that the top edges of the sewing and part 1 are inside the fold and sew along the junction of the tape and the sewing, bending the remaining side edges of the tape inward.
- Sew on a hook fastener, decorate the part with 1 decorative buttons, applique or embroidery if it is made of a plain fabric.
Dolls created based on the famous series “Monster School” immediately fell in love with children all over the world. A huge number of them have already been released. Various clothing options for school students are sold both in stores and on Internet sites. Monster High differs from other dolls in that they are super fashionable girls. Only modern clothes are sewn for them, adhering to fashion trends. Naturally, the cost of such outfits is sometimes fabulous.
Enterprising mothers will always find a way out of the situation. And our article will help you understand how to sew using the materials available in each apartment. You don't even have to go to the store. And the child can easily take off and put on homemade suits, sweaters and skirts, without worrying that his mother will scold him for torn expensive items.
With a minimum of effort, you can, knowing Monster High, create a large wardrobe by decorating the products with small bright details - beads, buttons, rhinestones and other accessories, which can be freely purchased at any specialized store.
We use a glove
If you are not a professional seamstress, then the easiest way to create an outfit is from a ready-made semi-finished product. In this case, we’ll look at how to sew clothes for a Monster High doll from an old, unnecessary glove.
It is better to choose a demi-season product so that the glove is not too thick. Having laid out one piece on the table, put a doll on top to measure the width of the future dress. The doll's head should lie in the place where the third finger is located. The collar of the dress will be placed in this place. You need to trim the finger on the glove so that about 1 cm remains on the collar.
The place for the index and ring fingers will serve as the doll's sleeves. You just need to cut off the extra curves at the ends. Having measured the required volume of the torso, cut off the excess edges of the glove with scissors, namely, the places for the thumb and little finger. The sides are sewn together on the inside.
Now you know how to sew clothes for a Monster High doll. All that remains is to decorate the dress at your own discretion and put it on the character. You can make a belt, decorate it with a bow of satin ribbons, or make a flower, such as a rose. You can sew several half beads in a row. Consult with your child. Children are the best dreamers.
Sweater made from sock
One of the options for sewing a sweater for a doll can be seen in the video below.

Using the same principle, you can sew another version of the outfit. It is better to take striped socks in bright colors. A sweater is sewn from several individual elements. The collar, bottom and sleeve cuffs are cut out of the sock elastic. The rest is cut out from the fabric itself, placing the doll on the product. First, the back and front are cut out at the same time. Make slightly sloping shoulders. Try the required width on the doll again. The excess is cut off and the parts on the sides are sewn together.

The sleeve cuffs are made wide so that the doll’s arms can be easily inserted into the sweater. The sleeves themselves are thin strips with oblique cuts at the top. At the end of the work, all the small details are sewn together. Since the sweater is striped, no additional decoration is required.
How to sew clothes for a Monster High doll from a sock?
As you can see in the photo below, you can cut out not only a sweater or a knitted dress from a sock. By cutting off the part with the elastic, you can sew a sports skirt. These are in fashion now. Make a vest with a V-neck.

Using the same principle as in the previous version described, instead of sleeves you can sew tights, leggings or stockings. And by simply cutting off a long strip and leaving the heel intact, you can tailor a cape with a hood. It will be enough to overlock the edges and attach a ribbon tie to the neck.
Set
Using just one sock with a bright pattern and knowing how to sew clothes for a Monster High doll with your own hands, you can create an entire outfit consisting of many elements.

To take measurements, simply place the doll on the fabric and trace it with chalk.
As you can see, tailoring is not as complicated as it seems at first glance. With a little effort and a little imagination, even a novice seamstress or a school-age child can do it.