Do-it-yourself educational book for kids.
Author: Cancer Anna Vasilievna, teacher primary grades MOU gymnasium number 1, Millerovo, Rostov regionMaterial description: I bring to your attention a description of a soft educational book that you can sew with your own hands. This material can be useful for mothers of babies, grandmothers and educators who work with babies (you can involve mothers in the work).
purpose: comprehensive development of the child.
Tasks:
develop fine motor skills hands,
develop thinking, speech of the child,
cultivate love for mom, grandmother.
Since childhood, we have all heard the phrase more than once: “ Best gift - the one that is made by hand. " You can disagree with this, but a period of light and joyous is coming - you have become a mother or grandmother. Among all the pleasant troubles, the question arises of where to get good, harmless, useful and educational toys?
The answer is: do it yourself!
Pros:
environmentally friendly materials (after all, for work we take natural fabrics),
safety (all fragments are soft),
positive energy (so much love has been invested!),
developing purpose (each fragment with some kind of task).
Minuses:
I didn't find them.
When my grandson was born, I decided to sew him a soft educational book. Before starting work, I drew future pages, thought it over, prepared necessary materials - and this is what I got:
1. This is the cover of the book. Artyom really likes that the book bears his name. The thermal sticker is fixed with an iron, the letters are stitched on a sewing machine.
2. We unfasten the "zipper" on the boot - a mouse lives inside (lies freely, not sewn). The toe of the boot is fastened with Velcro (Velcro).

3. The shoe will help the child learn how to put the lace into the holes. The mouse from the boot loves to climb into the boot.

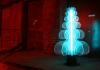
4. The pyramid can be disassembled, and then assembled (all fragments are on Velcro). Top element on a large button.

5. The wheels of the truck are double-sided, fastened with buttons. The driver and passenger change places periodically.

6. Butterfly, apples and fungus are fastened with Velcro, the prey of a hedgehog can be swapped.

7.A worm lives in an apple under a leaf - you can get it by unscrewing the leaf. The butterfly was once a caterpillar - this is the body of a butterfly, it can be detached by pulling it up.

8. Merry Christmas tree, Santa Claus, Snow Maiden and a bag of gifts. Each element of the Christmas tree is fastened with Velcro, you can put a small souvenir, sweetness in the bag.

9. "Sculpt" a snowman. Each lump is separated, they are on the buttons. The broom can be picked up by pulling it up.

10. The pocket on the last page (on the cover) for a reason: so that the details that the child separated are not lost, we put it in it.

Now my grandson is 4 years and 3 months old. He loves his book very much and periodically "rereads" it. Fine motor skills develop, attention develops, speech develops, and we, looking at him, rejoice.
Children from one to three years old are real fidgets. It is difficult to captivate them with something for a long time, they want to touch, touch and taste everything. It is through this interaction with objects that the baby learns the world. You can help your child in this process by sewing his own educational books from felt with your own hands. You will find patterns for their construction in this material.
All ingenious is simple: original ideas for sewing
Tactile felt book - very unusual toy... It will be difficult to break, tear or somehow spoil it. It is quite lightweight, pleasant to the touch, and also very interesting and exciting. You have probably already heard many times about developing children's books, and perhaps even seen them in stores.
They are sewn most often from soft and dense fabrics using additional accessories: buttons, fasteners, beads, zippers and ribbons. Studying each page of such a book by touch, the baby, without knowing it, develops fine motor skills of his fingers and trains sensory perception images. It is due to the variety of decorative elements that a developing book is not just a teacher, but also a rather interesting children's game.
In order to sew educational books for children from fabric with your own hands, first of all you will need page patterns. It is worth saying that here many options open before you, for example:
- For a little princess, on the book's page, you can depict a bouquet of flowers or a heart with cakes.

- You can cut out all the elements for this applique according to the pattern and attach them to the fabric using rivets.

- To create a thematic book about the seasons, this page sketch is suitable. Just as in the previous version, the fruit on the branch must be attached with clasps.

- Another good example of decoration is a dinosaur, whose tail and spines are attached to sticky tape.

- Try to cut these flowers according to the pattern and make a small botanical garden on the page.

- Or do ladybug with a bag on the back. You will find her sketch below.

The choice of an applique for a self-made developmental felt book largely depends on the basic design idea. On its pages, you can play a whole performance, where the main characters will be characters from fairy tales or cartoons.
For a child over two years old, you can come up with educational games for counting, learning the alphabet or developing speech. Everything will depend on your own preferences and, of course, your imagination.
Read also:
As an example, we offer you good master class on the creation of a soft felt book on the topic: "Where do butterflies come from."
We sew a book for a little why
Educational books for children with your own hands can be sewn from different fabrics, but it is always better to take dense felt as a basis. But for decorative elements it would be good to use material of different textures. This technique will help you learn to distinguish the properties of different objects, which is very important in early development child.
For example, you can cut the wings for a butterfly from lace, and the body from fleece. You will learn more about how to properly arrange the pages of a book and fix the details from the photo lesson. If you're ready, then let's start.

Necessary materials:
- pieces of multi-colored felt;
- folder;
- sewing machine;
- scissors;
- tapes;
- clasps;
- velcro.
Process description:
- First, cut out the felt pages for your future book. In total, you will need 4 of them for interior decoration and 2 for creating a cover.
- The first page will be devoted to the history of the tree and small caterpillars. You can cut out all the details according to the following pattern.

- Sew the main part of the tree and green leaves tightly to the page. To attach the tracks, we cut out small Velcro: we attach one part to the canvas, the other to the part.
- We hide the small doll under the leaf; it is desirable to designate it with a different color.
- In the finished version, the first page will look like this.

- On the second page of the book, we will tell the child what the caterpillars turn into when they grow up. Here we will depict flying butterflies and flowers.

- Sew only the stem of the flower, the core and the green grass to the canvas. Leave the petals intact to create a picture as close to reality as possible.
- Sew part of the tape to the body of the butterflies, hide the second under the grass. We will leave the moths themselves in free flight so that they can move to the flower and back to the ground.

- The third page of the book will be devoted to creativity. On it, the kid must figure out what colors to decorate the butterfly in.


- We will sew the butterfly to the page only for the middle, and let the wings remain free.

- The fourth last page is a kind of addition to the previous one. We will sew a large green leaf on it.

- Do not sew on the top edge of the leaf so that you can fit all of the butterfly wing decorations into it.
- That's all. A bright educational book is ready!
Shibanova Irina
Master Class
Working on the creation of a baby book is a very exciting activity that has a complex effect on the development of a child:
Promotes the development of creativity of preschoolers;
Increases sensory sensitivity, that is, it contributes to the subtle perception of form, texture, color;
Develops imagination, spatial thinking, general manual skill, fine motor skills;
Synchronizes the work of both hands;
Forms perseverance, the ability to plan work on the implementation of an idea, to anticipate the result and achieve it, if necessary, make adjustments to the original plan;
In the course of creative activity, children make many discoveries, achieve personal achievements. The result obtained is the first and very important stage of children's creativity.
Material:colored cardboard, A4 sheets of paper (different colors can be used, old coloring books or children's magazines, glue stick, scissors.
Description of the process of making a baby book:
1. First we make the pages. To do this, take colored sheets of A4 paper, fold in half (lengthwise) and cut along the fold line.


2. Cover the edge of the sheet with glue and glue. Depending on the thickness of the book, there may be 2-3-4 such leaves.


3. We fold a long sheet of paper like an accordion.


5. We coat the edges of the cover with glue and glue in the prepared pages.


6. Now we proceed to the design of the book. We come up with a name and write or paste it on the cover.


8. The baby book is ready!

Other options for baby books in which the pages can be fastened with braid.


I wish you good luck and creative success!
The book can be sewn entirely from felt or in combination with other fabrics. One of the main advantages of a felt book is that you do not need to process the edges. And one important point: the better the materials used, the more presentable it will be appearance finished book. Therefore, do not use old diapers, worn clothes or similar materials for sewing.
Here is a basic list of materials used:
- Felt. I already wrote about the kind of felt in the publication about. I will just say that hard Korean felt is most often used for developing books. It keeps its shape well, the edges do not crumble, and the product will retain its original appearance for a long time.
- Cotton. It is often used as the basis for book pages. Among experienced craftswomen, cotton made in America is popular. Cotton from China, Korea, Thailand, Poland, Russia is also used. The main thing, when choosing, to pay attention to the quality of the fabric, its density. Cotton works well for patchwork. For example, such a ready-made set of cotton cuts can be bought on the Aliexpress website.

- Fleece, imitation leather, artificial fur. These fabrics are often used in educational books to simulate various surfaces. For example, brown faux leather will look good as a tree trunk.

- Flizelin, dublerin. Used to seal the pages of educational books. Collar doublerin is mainly used, it is also called bando. It has a high density, which means that the pages will keep their shape well. Important: do not use cardboard to seal the pages! Otherwise, the book cannot be washed.
- Glutinous cobweb. Used to fix various details on the page.
- Sintepon. It is laid between the pages of a developing book to add volume.
- Velcro cloth. An irreplaceable thing when creating a developing book from fabric. It is a soft part of the contact tape (Velcro), and can take up a whole page or part of it. For example, in this way you can create a felt puzzle. There are two types of velcro fabric: on an adhesive basis and without an adhesive layer.
Irina Sorokina has an excellent video on working with Velcro. Be sure to check it out if you are seriously thinking about sewing an educational book!
- Velcro (contact tape). Not a single developing book can do without it. With the help of Velcro, removable elements are attached to the pages of the book. Usually the hard part of the Velcro is sewn onto the removable element, and the soft part is sewn onto the page itself.
- Waxed thread, hat elastic, various strings, ribbons. I would like to talk about the tapes separately. In developmental books, it is permissible to use only rep ribbons, but not satin ones. This is due to the fact that satin ribbons will quickly deteriorate due to the velcro, which are usually abundant in fabric (felt) books.
- Beads, buttons, sewing on rhinestones, beads and other decorative elements.
Compared to previous years, today store shelves are replete with children's books of various themes and designs.
Colorful and interesting, educational and educational, but, unfortunately, children do not always like them.
None of the hard copies sold can match a book made by the kind hands of a loving mother.
For the sake of fairness, it should be noted that not every family can afford to buy books for their baby often, and the bought ones quickly get bored and become unattractive. But there is an opportunity to give the little researcher a new unusual book at least every week.
 Learning about the world around, the child learns the most common things for an adult. For example, insert a lace into a shoe and tie it in a knot or bow.
It would seem such a simple task, but it often baffles the kid. Going to the kindergarten, he will often feel the displeasure of the teacher on himself, since he will detain the entire team before the walk, if he cannot quickly and deftly cope with his laces.
Therefore, the mother needs to try and teach this difficult activity to the baby in advance, turning this event into an exciting game. This may well be helped by a book in which there is an imitation of a pretty shoe.
In this case, a homemade book is presented, consisting of only two unusual pages. On one of them, you can teach the child the first words, and on the other - to tie the shoelaces.
It is not necessary to purchase expensive materials for making a book, you can completely get by with what is in the house, bribing only little things that will cost a penny compared to new book products.
For manufacturing you will need pieces of fabric of different sizes and colors, two pieces of cardboard, lace, threads, a needle (and preferably a sewing machine), double-sided tape and a gypsy needle.
To simulate a boot, you can use the top of a real children's sneaker or a sneaker, which has become too small.
The first step is to prepare the base of the book - these are two identical pieces of cardboard - you can choose their size to your taste.
In this case, a city is made on the left side, consisting of houses of different heights with windows that can be counted.
Clouds, birds, leaves, trees - the child should know all these names.
Turn on your imagination and come up with something of your own, the main thing is that everything works for the development of the baby.
On right side arrange lacing and funny animals.
Sew the edges of each part of the applique on a sewing machine or sew by hand - the fabric should not unravel.
Then fix all the details on the fabrics using double-sided tape - this way they will not move when sewing.
When all the details are sewn on, the front side of the work is fastened to the fabric without appliqué on three sides.
Cardboard is laid on the unstitched side, the fabric is stretched on it and sewn up. The same is done with the second side of the book.
The last stage is the connection of the two parts to each other. To do this, you need to take a gypsy needle and thick yarn, sew loosely over the edge the parts folded together on one side.
If desired, a fabric picture can be made on the front side of the book, where you can place an application that allows you to learn numbers or letters.
 The kid will love this book if you make it out of fabric, pleasant to the touch, and arrange bright and interesting pictures in it.
What you need to make a soft book can always be found at home among old things.
It is very important to choose the color of the fabric so that it attracts the child's attention.
You need to prepare:
- pieces of multi-colored cotton fabric;
- felt;
- synthetic winterizer;
- button;
- gypsy igloo;
- double-sided tape.
Decide on the number and size of pads that will make up the book. Multiply the selected amount by two - that is how much you need fabric cloths of the same size.
It is desirable that it be of the same quality, since otherwise, the pages will look sloppy.
The synthetic winterizer should be cut 5-8 mm smaller than the fabric.
You can even put the entire alphabet in such a book, placing 3-4 letters and objects that begin on it on each pad.
Secure the applique to the fabric with double-sided tape.
Then sew it on a typewriter or by hand.
Each piece of appliqué cushion is sewn with a non-patterned fabric on three sides.
A synthetic winterizer is put into the finished bag, and the pad is sewn on a typewriter around the entire perimeter.
When all the pieces of the soft book are ready, they are sewn like a clamshell book using a large needle and thick yarn.
The last to be sewn is a fabric strap with a loop for fastening, a button is placed on the top pillow.
This version of the book will help the kid learn numbers - first up to five, then it will be possible to add pages with numbers and up to ten to it.
What is very important in this craft - this is to make the numbers removable so that the little mathematician can find the page that corresponds to the desired number himself.
The book can be made folding so that all the numbers and pictures are in front of your eyes at once, or you can fasten them only on one side and turn over.
For this product you will need:

- five pieces of cardboard, the size of which you choose yourself;
- fabric of a calm color for the background - it should not distract the baby's attention from pictures and bright numbers;
- thick fabric for numbers and appliqué (it is good to use felt, but if it is not there, you can also use ordinary fabric by folding it several times);
- pieces of Velcro that are sewn on or glued to pages and numbers (i.e. these parts will be removable);
- for counting items, you can use buttons, small beads or other objects of interest to the child;
- thin ribbons, ribbons or thick yarn;
- gypsy needle;
- double-sided tape.
Ten pieces of fabric are cut out according to the size of the prepared cardboard.
Next, an applique is prepared for each number - it can be several geometric shapes, a tree with apples, a few sweets, etc. The choice of picture will depend on your imagination.
For its manufacture, it is better to use felt, since it does not dissolve into threads and looks voluminous on a flat surface.
The fabric with ready-made appliqués, sewn on buttons and a piece of Velcro is sewn to the canvas without a pattern on three sides. Cardboard is inserted into it. Then the fabric on the cardboard must be pulled well and sewn on a typewriter or manually through.
Now it's the turn of sewing numbers. In order for them to be neat and beautiful, it is better to print the template. According to this pattern, figures are cut out of felt (each must consist of two parts), which are sewn together by hand with an overcasting seam. Velcro is sewn to each of them.
The pages can be bound with ribbons, as in the book shown in the photo, or they can be stitched with thick yarn using a "gypsy" needle over the edge so that the book can be closed freely.
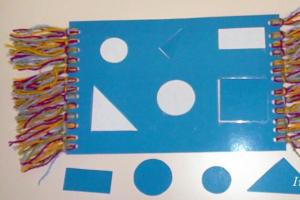
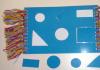
 This book will teach your kid to choose the right figures by name and insert them into the desired shape. She can keep the young prodigy for a long time and help to develop logical thinking, arousing the interest of the kid.
To make a book you will need fabric, synthetic winterizer and braid, the length of which should be equal to the height of the book, multiplied by two.
You cannot do without a sewing machine in the manufacture of this book, since a large number of lines will be required.
Choose the size of the book yourself, but you don't need to make it too large - it should be convenient for the child to hold the figures in the handles and turn the soft fabric pages.
The fabric should be chosen from cotton, as it is easy to sew and does not deform. It is desirable that it be bright beautiful shades, plain or with a small geometric pattern.
Four fabric and two synthetic winterizer rectangles are cut out - they will be the pages of the book.
To two of them, a synthetic winterizer is swept around the entire perimeter, then the middle of the rectangles is indicated with a line.
On each half of it there will be a hole of a certain shape, into which they will enter, like corks attached to the braid of the figurine.
Next, the figures themselves are cut out - it can be a heart, square, circle, triangle, rhombus, etc.
Figures are sewn from the inside out and turned inside out. A synthetic winterizer is put into them, then they are quilted, a braid is sewn to them, with which they are attached to the book.
Then each figure is superimposed in the middle of its page and outlined with a pen. Further, a synthetic winterizer is sewn to the fabric from the seamy side, and it is sewn. The lines run at a distance of 1 cm from each other in a delineated shape.
After stitching, the contoured figure is neatly cut and hemmed.
The next step is stitching the parts.
Rectangles with cut-out figures are sewn to a single piece of fabric from the wrong side, turned inside out and sewn along the middle line that goes around the cut-out shape.
Then the finished rectangles are fastened to each other along the middle part and the figures on the braid are sewn there.
Book "Seasons"
 This version of the book will be a useful thing in expanding the horizons of the baby. From it he will be able to find out what happens in different times years - when the leaves turn yellow, snow falls, trees bloom and fruits ripen.
The book has four pages, decorated in a special way. Colorful fabrics and pictures will help make it interesting and attractive.
For making, you need to pick up the fabriccorresponding in color to each season:
- spring - pink, white, pale green;
- summer - red, juicy green, bright yellow;
- autumn - yellow, orange, dark green;
- winter - white, light blue, dark blue.
Having picked up the fabric, eight squares of the desired size are cut out of it. A fabric with a suitable color scheme is put on the front side. It is desirable that it be dense, since an applique is sewn onto it.
Drawings for her can be selected on the Internet, use the ones presented in the photo, or come up with yourself. Then the drawing is transferred to the fabric, carefully cut out and baited with double-sided tape.
If it is possible to sew on the applique using a sewing machine, then this will be the ideal option. You can do it manually, but the work will take longer.
The fabric with applique is sewn to the back.
Openwork crocheting added additional decorativeness to the overall image of an unusual book.
The last stage of the work will be stitching the fabric sheets. The book will turn out in the form of a rug that can be folded in four.
Doing things for babies with your own hands, you put some of your love and warmth into them.
No purchased item, no matter how expensive it is, will not replace the one made by a loving mother. Perhaps it will become your child's favorite toy, and he will keep it for life.
pay attention to reading teaching techniques child in our article