We will need: yogurt cups, a plastic egg or a bottle cork from a kinder surprise, foil, glue, wire. 
We coat the glass with PVA glue, wrinkle the foil a little, then straighten it and put it on the glass, as if wrapping it. My daughter did it without glue, holds up well too 

Turn the glass over and fill the leftovers inside, cut off the excess. In my bell, I smeared everything with PVA glue, and the edges, so that it would better hold. After processing PVA, the object becomes stronger. 
Cut off a 40 cm wire, fold it in half. We take one half from the kinder, turn it over and make a hole on top in the middle, push the wire into it, leaving a loop of 10 cm, wrap the kinder with foil, hide the rest of the foil inside. 
We make a hole on top in the middle of the bell blank (as in the photo). We push the wire into this hole, glue the blank from the kinder and the glass with hot melt glue. 
We make a ball out of foil. We twist the wire inside the bell blank slightly longer than the middle of the blank, divide the wire in half, put the ball, connect the ends of the wire and twist it, cut off the excess. Then we take some foil and wrap it tightly around the ball. 
The bell is ready. 
It is better to prepare for the New Year in advance. DIY bells on christmas tree - a good idea... Even in the works of ancient authors, the ability of bells to drive away evil forces was reflected. There are many options for making bells from scrap materials. We have selected the most original ones.
We need:
- Bandage or gauze.
- Eggshell.
- PVA glue.
- Brush.
- Paints (including gold).
- Putty, beads, semolina (optional).

Manufacturing method No. 1
We take the shell and bandage. We glue the bandage "overlapping" with PVA glue.

We strengthen our bell, it should dry well.


Prime with white paint so that the shell does not show through. When the bandage is dry, cut out the petals with scissors.

We make a hole on top with a sharp object. The hole is for the lace. We glue the husk on top and paint.

The bells are painted with Easter dyes + watercolors. The leaves of the bells can be easily bent.

Manufacturing method No. 2
We take the shell, bandage and PVA glue. We glue the shell inside. This is also a way to strengthen the shell. We leave to dry on the battery. Then we cover it with white paint on the outside.

Cut off all unnecessary with scissors. Easy to cut.

Then we apply the putty and you can paint it with a pattern. Let it dry. We paint and go through the bulges with gold paint. We make a hole for the lace on top.


You can decorate the top with beads, you can make a "dusting" of semolina. Spread on top with a brush with glue and sprinkle with semolina. We turn on imagination and make a toy.


For 1 bell you will need:
- Styrofoam or cardboard (cone, mini size).
- Yarn or twine.
- Felt.
- Palettes.
- Decorations.

Tools:
- Universal glue.
- Scissors.
- Needle.
- Tweezers.


We need:
- Plastic cups.
- Artificial tree twig.
- Spray paint.
- Glue.
- Beads.
- Ribbons.
- A piece of lace.
We take two plastic cups (it is possible from under the yogurt). We paint the cups with spray paint and spruce twig... The color can be any: golden, silver, bright red.

While the cups are drying, we are preparing the decoration. You can cut flowers from lace, guipure. Sew beads in the middle.

We coat the flowers with glue and attach to the bell.

We wrap the edges with yarn.

We take a beautiful ribbon, collect in the middle on a thread with a needle and make a lush bow.

We fasten the bow with a needle and thread. We hang them on a Christmas tree or glue the bells together at an angle, glue them to a spruce branch and hang them with tape on the wall.

So, prepare a few different sized plastic cups that we will need to make the bell. Why several and different sizes? And so that you have not one bell, but two, three or four. It depends on how many cups you are.
Now take a glass and make a small hole in its bottom. There are several ways to carry out this simple procedure. The first way is to take regular scissors and twist a small hole with a sharp end.
The second way is to ask adults to make holes in small cups with. A lighted match can easily burn a hole in a plastic cup. Just in no case try to burn a glass with a burning match without adult supervision. Because, as you probably know - jokes with fire can lead to a lot.
The bell will be decorated with a beautiful bow
Now, to continue making a plastic bell, let's prepare for it beautiful bow... And you can make it from colored paper or tape. Fold the ribbon in half and tie it with another thinner ribbon. When you make a bow, sharpen the short end of the ribbon with which we tied this bow.

Now, on this pointed end, as if on a needle, we string a glass and beads. Beads can also be selected in different colors and sizes. The strung beads will be the bell tongue. And at the very tip of the tongue, we will tie a small one.

Now we begin to decorate the bell with beads using glue. We spread the glue on the outer surface of the cup. Spread the glue gently so as not to get dirty. After all, everyone knows that glue is very difficult to wash off clothes. Lay beads of different colors in rows, one after another, remembering to grease the glass with glue and tightly squeeze the rows of beads together. If you are tired of decorating the bell with beads, then you can add stars.


Such a bell can be wonderful new year gift, made by hand.

You can make several of these bells in different sizes and decorate your Christmas tree with them. Parents will be very glad of your such active participation in the preparation of the New Year holiday.
And, for today, the lesson of children's crafts is over. Until next time!
New Year - the most joyful and magical holiday. Preparing for it gives a lot of pleasant trouble. To create a fabulous atmosphere in the house and give yourself a festive mood, you can start making christmas crafts... Making them with your own hands is simple and interesting. Involve children in this entertaining hobby so that they do not get bored and also get ready for the main winter celebration. Try to make DIY Christmas bells together
Beautiful symbol of the New Year
 The custom of decorating a home with bells came to us from Europe. There was a superstition that their ringing was capable of scare away evil spirits. To prevent dark forces from interfering with celebrating the New Year, bells were hung on the Christmas tree along with other toys. This tradition has taken root well all over the world. And today even people far from superstition decorate houses for New Year and Christmas with bells. Because it is very nice holiday souvenir.
In those distant times, people made huge bells from bronze. They were used not only as amuletbut also as a signaling tool. By ringing, the population was informed about various events or summoned to a meeting. Now this signal is used in educational institutions. Every September 1st the first bell rings, and before the summer holidays we hear the last school bell. So you can safely consider the bell as symbol the beginning of the next year.
What can you make a bell from?
A New Year's craft can be made from various materials at hand. For example, from paper or cardboard, from a plastic bottle or disposable cup, from fabric or rope. The bell shape can be knitted, beaded, or papier-mâché. Excellent crafts are obtained from spruce and pine cones, ctwig pots, styrofoam, egg trays and shells.
 In short, a souvenir can be made from any assistants bell-shaped materials. Therefore, look at your home for items that have not yet found use for themselves. Thanks to simple master classes they will turn into bright original christmas decorations.
First, let's figure out what any bell should consist of:
- dome;
- tongue;
- suspension.
Since we have a New Year's souvenir, so you will need all kinds of thematic decoration. For additional decor, you need to take: pine needles, tinsel, sparkles, rhinestones, beads, sequins, lace, ribbons and bows. You can use a special curly hole punch with the shape of a snowflake or star.
Bells made of paper and cardboard
 Most simple crafts obtained from paper or cardboard. You can take white album sheets, and then paint souvenir. It is more convenient to use colored paper and cardboard. To work with them, the following tools are useful:
- pencil;
- compass;
- scissors;
- pVA glue;
- needle and thick thread.
Yellow paper bell
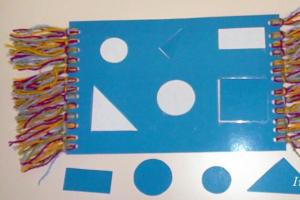
Let's make a volumetric Christmas tree toy out of paper in stages. This requires colored paper (yellow, green, red), woolen thread and large beads.
Instructions:
- Draw a circle about 8 cm in diameter on yellow paper with a compass and cut it out.
- Draw 2-3 small leaves on green paper. We cut them out along the contour.
- We make small circles from red paper. These will be rowan berries.
- We take a piece of thread about 15 cm. We string 2-3 beads on it from both sides, and then we tie knots at the ends. This will make the bell tongue.
- We put the thread on the yellow circle so that the loop looks out from above. Roll up the paper slightly and glue the base. Glue the leaves and berries on top.
Now the cute bell is ready. They can be used to decorate a Christmas tree or hang on the wall.
Christmas bell made of cardboard
This cardboard craft will become an original decoration for every Christmas tree. Prepare a piece of cardboard, scissors, a needle, yarn, and jewelry.
A step-by-step diagram will tell you how to make a cardboard bell:
- Preparing the cone shape. To do this, cut a circle out of the cardboard and cut it in half. Fold a semicircle and glue the sides of the cut together. Wait for the glue to dry.
- Lubricate the finished cone with a layer of glue and wrap its entire surface with thread. Choose the color of the yarn at your discretion.
- Take two large beads. Hang one on a thread and leave it as a tongue. Now you need to thread the thread through the top of the cone and string the second bead, and then make a knot and a loop. So the structure will be securely fastened.
- Add decor to the Christmas tree toy: sequins, lace or other decorations.
Christmas crafts from plastic cups and bottles
 Plastic cups are a great inexpensive consumable for all kinds of crafts. You can also use unnecessary plastic soda or milk bottles. Small glasses make wonderful herringbone bells. The shape of the bottle is larger, so it is better to make an interior decoration or a toy for a very large Christmas tree from it.
Party bell from a bottle
What materials are needed:
- plastic bottle;
- festive paper napkin;
- tinsel;
- bow.
Let's start the master class:
- Cut off the top of the bottle.
- Apply glue on the outside and wrap with a napkin. Tie a thread on top of the neck. Bend the bottom edges inward.
- We glue a bow on the dome. We fasten tinsel along the bottom edge with a stapler.
 A bright New Year's bell is ready to decorate your home. It can also be made functional. Take a small real bell and use all-purpose glue to attach it to the inside of the craft. Now the New Year's souvenir will be able to make a beautiful ringing.
The cut-off half of a plastic bottle is decorated in different ways. You can leave it transparent and paste over with miniature stickers, wrap the bottom and lid with tinsel. If you make a hole in the lid with an awl, you will be able to hang the bead on a ribbon, and also make a loop.
The surface of the bottle can be coated with paint, and then laced with lace. Decorate the lid with sequins and add a thin ribbon pendant.
Gold and silver bells from glasses
Try to make Christmas decorations out of cups.
Collect the following set of items:
- two disposable glasses;
- artificial spruce branch;
- a can of gold paint;
- glue;
- wide tape;
- white lace;
- beads.
 We start to do the craft:
- We paint the glasses with paint. Apply some golden spray to the branches.
- The cups will dry for now. Therefore, you can cut beautiful lace elements. For example, flowers. Glue beads into their centers. After the paint has dried, we glue the flowers onto the dome.
- The edges of the cups can be wrapped with fluffy yarn.
- We make a lush bow from a ribbon, tying it in the middle with a thread.
- We fasten the bells, bow and spruce branch together.
Instead of regular plastic cups, you can use yogurt containers. Now let's make a silver bell to decorate the Christmas tree. You will need: glass, foil, tinsel, lace, scissors, awl and hook.
- At the end of the lace we tie a piece of colored tinsel to make the tongue of the craft.
- Wrap the glass tightly with foil.
- With an awl we make a hole in the bottom of the glass. We will stretch a lace through it, a hook will come in handy for this. Let's make a loop and a knot.
- Wind lush silver tinsel around the loop.
 Not only Christmas tree decorations are made from cups. Even a whole New Year tree can be made from this simple material. A Christmas tree made of cups will turn out if you fasten them to each other with a stapler. This will require many identical green glasses. The finished structure is decorated with beads, beads and rhinestones.
Eggshell and Tray Favors
To keep the shells and egg trays from disappearing, make colorful Christmas toys out of them. Just before the New Year, start collecting the materials you need. Try to break raw eggs not in the middle, but on the edge. We should have whole bell molds.
 For crafts, take eggshell, gauze (bandage), thick thread, PVA, paints and a brush. For decoration, you can add semolina, beads or putty.
There are two ways to make a Christmas tree toy from a shell.
Manufacturing method No. 1:
- Cut the gauze into pieces. We glue them on the outside of the shell. This procedure is needed to strengthen the fragile material.
- After the glue has dried, cut out sharp petals on the shell. We paint the surface with white paint.
- Use an awl to pierce the hole for the lace.
- We glue a shell mosaic on the shell and paint it.
Manufacturing method No. 2:
- We glue the shell with gauze from the inside. For quick drying of the glue, you can put the workpiece on the battery.
- Paint on the outside with white.
- With scissors we make the cut of the shell even.
- Let's take care of the decor. Put putty on the shell to create embossed patterns, then paint over the dried surface. You can spread the craft with glue and sprinkle with beads or semolina. Connect your imagination to create a colorful toy design.
- We make a hole on top and insert a loop.
For MK with a cardboard egg tray, you need to take colored paper, glue, scissors, rope.
- Cut out the cells from the cardboard tray.
- We glue the cells with paper of different colors.
- We pierce the top for attaching the lace. You can also hang a large bead on it.
If you start collecting colorful foil candy wrappers in advance, you can replace colored paper with them. You will get very beautiful shiny bells.
Bells made from other unusual materials
Make your Christmas tree truly festive and different from others. Green beauty, dressed up with her own crafts, will look great and original. Let's try to make a few more christmas toys from different materials.
From flower pots
Let's take some clean flower pots and start decorating them:
- At the bottom, we immediately drill a hole for hanging the future toy.
- Now we decorate the surface. You can just wrap it in foil and glue the tinsel.
- Another decor option is with cones. Using pliers, carefully separate the "leaves" of the cones. Then we glue the pot with them. Better to use a hot glue gun. Additionally, we will decorate the craft with artificial spruce, beads and sparkles.
From twine
DIY bell craft can be successfully made from linen thread. We take the twine plastic bottle, package, PVA, scotch tape, glue gun, scissors and decor (beads, ribbons).
- The bottle will act as a shape. Therefore, you need to wrap tape around the transition from the cap to the bottle. Thus, we will align it, so that later it is easy to remove the craft from the form.
- We put a bag on the bottle and fix it by tying it at the bottom.
- Lubricate the surface of the bag with glue and wrap a linen thread around the bottle. We reach this way to the middle of the bottle. We are waiting for drying.
- We remove the blank from the bottle and remove the bag.
- We decorate as you wish.
Papier-mâché
Preparing a mold - a real bell, glass or other similar object. And also we will collect such consumables on the table: paper, paste or PVA, cling film.
Papier-mâché bell workshop:
- Wrap the glass with cling film. This is necessary so that the future craft can easily detach from the mold.
- We tear the paper into pieces, moisten them in glue and put them on a glass.
- We are waiting for the blank to dry and decorate it as imagination suggests.
For knitting bells and making them from beads, you will need special patterns.
Choose any method for creating a New Year's craft. Decorate the Christmas tree, interior with bells and use them as gifts for family and friends.
Attention, only TODAY!